The Galley

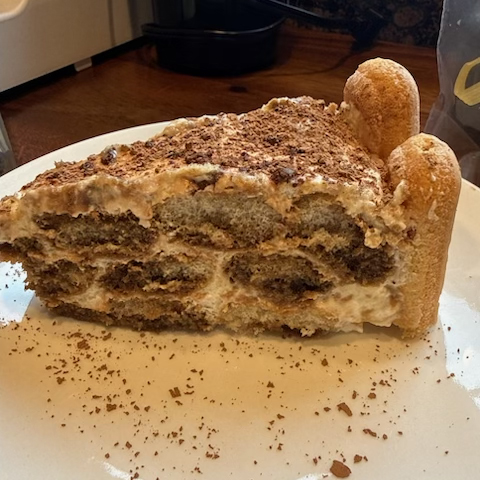
Tiramisu
I had a hard time coming up with a recipe to share this week—not because I have been letting my knives get dusty. Quite the opposite. I have been in the kitchen cooking up a squall. I just couldn’t pick what my favorite dish was.
Now, many of them were ones I have posted before. The bolognese—if you haven’t made this yet, then stop reading this right now and do it! I sometimes forget how fantastic it is with very little effort. All you need is a few great ingredients and time. Street tacos are another favorite. I could eat them every day and never get tired of them. My last round, I added beef birria to the mix and will never do ground hamburger again. It’s a seriously delicious upgrade that does not disappoint. Google a recipe for it and give it a try.
There were so many others, but I have to go with one I tried for the first time. While it may not be 100% authentic, it was so satisfying to make. Even this girl—who can sometimes second-guess her baking prowess—felt like I nailed this simple but elegant dessert. So let’s get started because, like the bolognese, it takes time to set up….
The Ingredients
- 1 1/2 cups heavy whipping cream
- 8-ounce cream cheese, room temperature
- 1/3 cup granulated sugar
- 1 teaspoon vanilla extract
- 1 1/2 cups cold espresso
- 3 tablespoons coffee-flavored liqueur
- 1 package ladyfingers
- Cocoa powder, for dusting the top
The Directions
- Add the whipping cream to a mixing bowl and beat on medium speed with an electric mixer (or use a stand mixer). Slowly add the sugar and vanilla, and continue beating until stiff peaks form. Add the mascarpone and fold in until combined. Set aside.
- Add the coffee and liqueur to a shallow bowl. Dip the ladyfingers in the coffee (don’t soak them—just quickly dip them on both sides to get them wet) and lay them in a single layer on the bottom of an 8×8-inch (or similar size) pan.
- Smooth half of the cheese mixture over the top. Add another layer of dipped ladyfingers, then smooth the remaining cheese mixture over the top.
- Dust cocoa powder generously over the top (I use a fine mesh strainer to do this. If you don’t have one, a slotted spoon will work in a pinch). Refrigerate for at least 3–4 hours, or up to overnight, before serving.
Notes
The alcohol can be substituted by soaking the ladyfingers in strong, sweetened coffee, adding a splash of vanilla extract, or even using a caramel syrup.
This recipe was adapted from Taste Better From Scratch.
Vanilla Extract
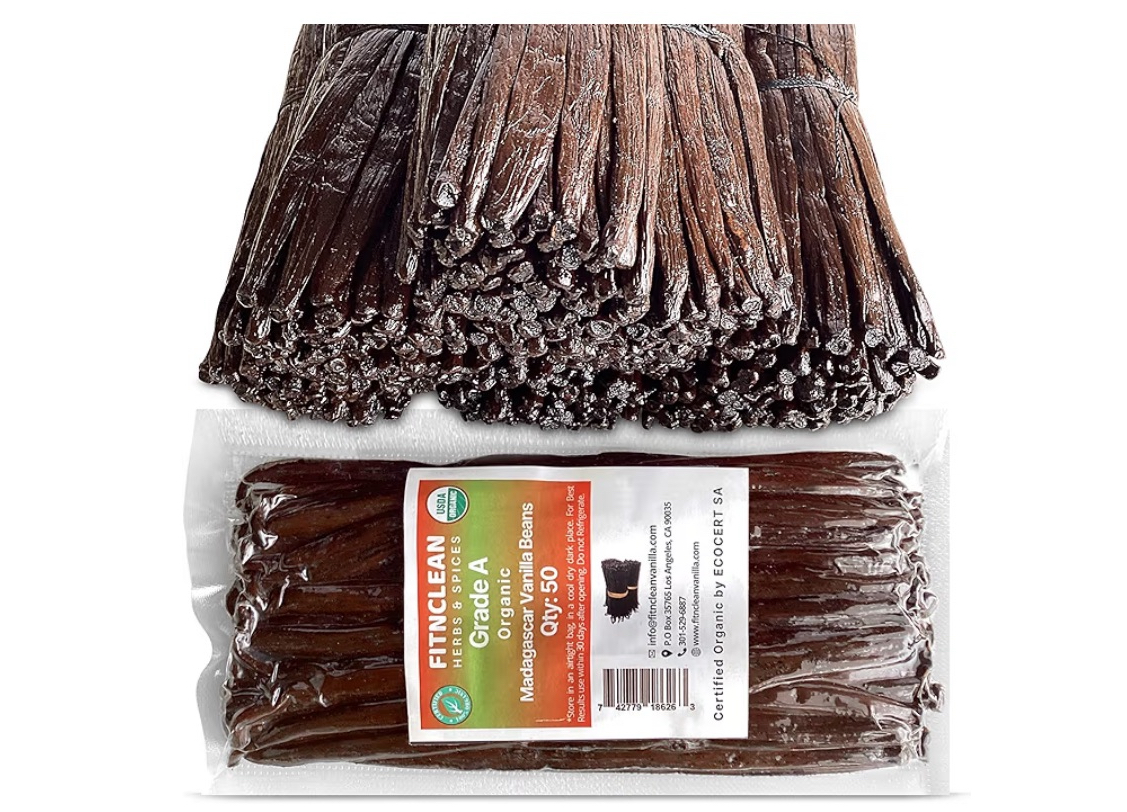
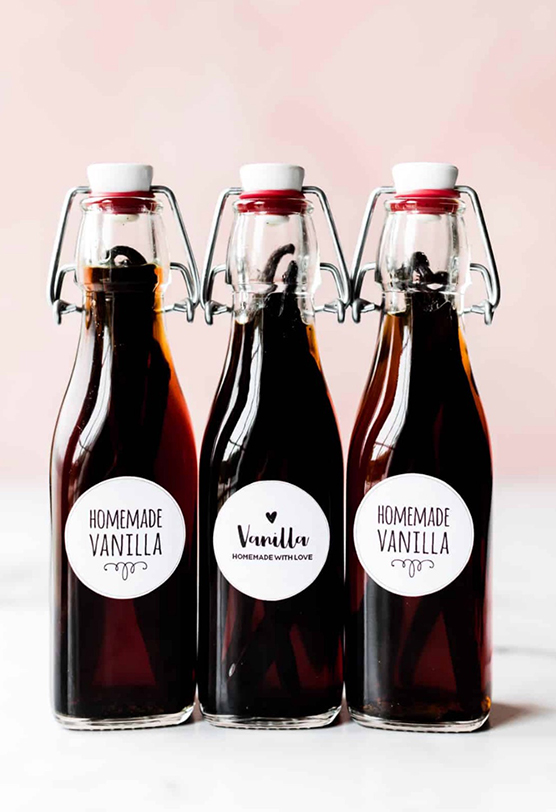
Ok. This recipe is going to be short but great for making sweets. Vanilla Extract. It’s simple to put together, but there is one difficult part. It’s the wait time! This concoction needs to sit for a good 6–12 months to develop its full flavor, but trust me… it’s worth it. The pure, clean taste alone is a reason to dive into this process, but if you need another, the cost savings alone will have you splitting beans and getting yours going soon. Now, why did I decide to fall down the vanilla bean hole? Because I am getting ready for the holiday season.
Yes. I did not make a mistake and meant to say boating season. The holiday season is my endgame for this extract. As you might have seen in previous posts over the last year or so, I like to make homemade libations for gift-giving. My limoncello and Kahlúa are always appreciated under the tree, and it has become a tradition I enjoy. What made me want to divert a bit this year is that I found I am suddenly surrounded by family and friends who have been making some fabulous baked goods, and I myself have been inspired to throw my measuring cup into the ring and give it a try. I have learned quite a bit and still have loads to discover, but one thing I have realized is that good (and sometimes not-so-good) extract is costly. When I did some sleuthing around online, I found that you only need two things: good vanilla beans and vodka. That’s it. So here it is. Don’t blink or you may miss it!

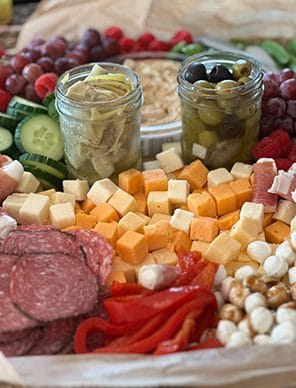
It’s All About the Apps!
I love a good holiday meal. Bring out the turkey roasted to perfection with a crispy skin, a beautiful prime rib with horseradish sauce and scalloped potatoes, maybe a risotto with an abundance of fresh shellfish. It is a time of decadence for sure—but do you want to know what my ultimate guilty pleasure is? It’s the appetizers.
The small bites of food set out at the start set the tone for the meal, both gastronomically and socially. They take the edge off the hunger pains while you wait for the main course to be finished, and they allow people to interact with each other while exploring different bites.
Now, as you may know, I am a big fan of the charcuterie board. If you look back on past posts, I’ve highlighted my favorite offerings for this. I do, however, like to add a few special items to elevate the experience. Below are links to some of my recent favorites.
Shrimp Balls
https://www.instagram.com/reel/DJ0VcP6RVAz/?igsh=MTRydW1tcDU4aWR1ZA==
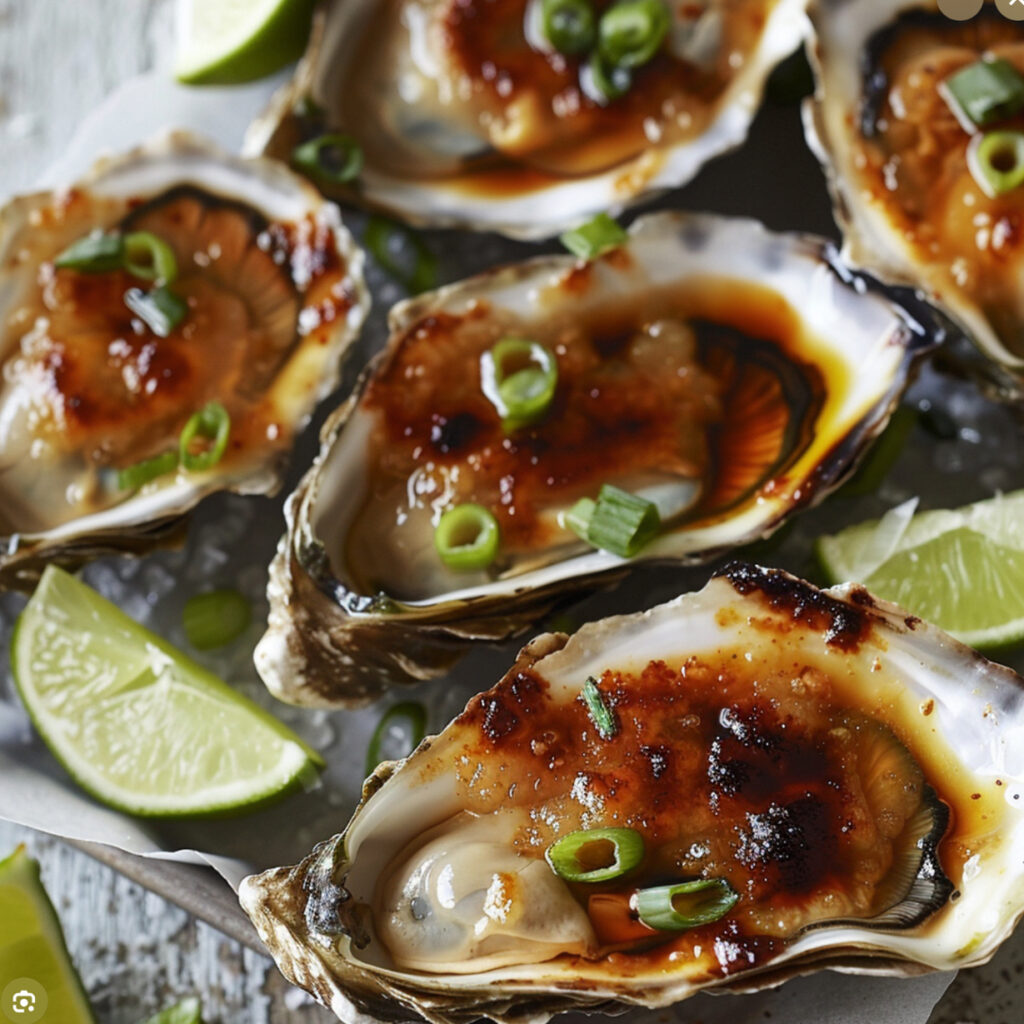
Miso Glazed Oysters
https://getfish.com.au/blogs/recipes/miso-glazed-baked-oysters-recipe?srsltid=AfmBOoqK1zMfBr6RdQiIM_5LNlJJ8kP9TyeEdYmLnPZfb9i_7kDZA_rO
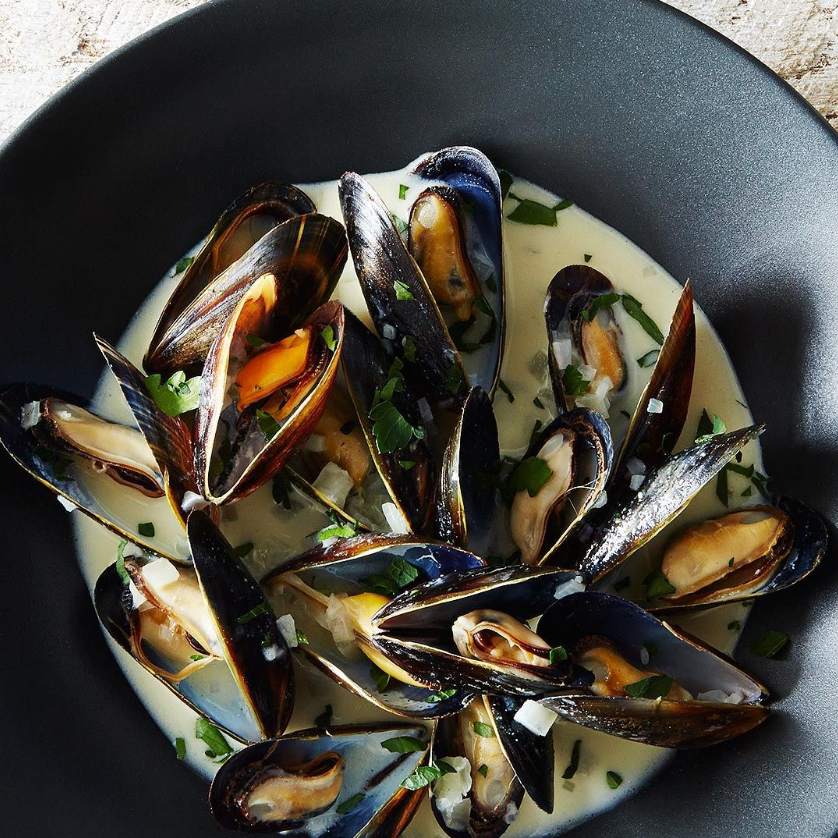
Mussels Dijonnaise
https://food52.com/recipes/19170-mussels-dijonnaise-steamed-mussels-with-mustard-sauce
Filet Tenderloin Crostini with Parmesan White Wine Cream Sauce
https://www.halfbakedharvest.com/beef-tenderloin-crostini/
Firecracker Meatballs
https://www.savorybitesrecipes.com/2023/07/firecracker-meatballs.html
Note:
Cocktail chicken meatballs are my go-to freezer staple for quick meals, appetizers, and soups. They are easy to make and can be used in so many different ways. Go Greek and stuff them in a pita with tomatoes, feta, and tzatziki. Serve with a piccata sauce. Buffalo them up! The ideas are endless, and you’ll be thrilled to have them on hand for weeknight dinners.


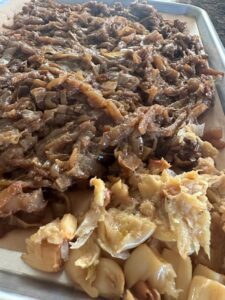
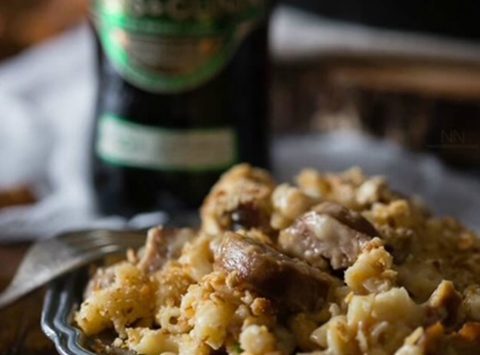
Bratwurst Mac and Cheese
It’s October, everyone, and time to break out the Brats! We recently attended a party to celebrate a dear friend, and the theme was Oktoberfest. As I can’t help but get involved with the food somehow, you know I had to dig deep into this phenomenon and try my hand at a dish. My first thought was a beer cheese fondue. I thought the rich melted cheese with soft pretzel bites would be a good fit. Then bratwurst kept coming into my mind. So what do you do? Google. Lo and behold, Bratwurst Mac and Cheese is a popular recipe, so I had to give it a try. Pasta layered with a creamy beer cheese roux. Topped with brats poached in dark beer and then grilled with a finishing touch of crushed pretzels. Get out the lederhosen and bust out a traditional dance. It was a fantastic combination with so many distinct flavors that brought fall flavors to life. As I certainly did not have the brain span to come up with this on my own, I am going to share the recipe I found and altered to my taste. It’s fairly easy, great for a crowd, and it’s a fun twist on your usual Mac and Cheese. So let’s get the cheese grater out and get started….
The ingredient substitutions I made:
- 1 package of beer bratwurst instead of the chicken sausage
- 3 packages of beer cheddar (shredded), I found this at Aldi’s
- Guinness beer
The recipe variation:
I parboiled the Brats in Guinness until they reached temperature
Are you seeing a theme here….if you cannot source out my substitutions, feel free to try the original recipe.
Ingredients:
-
1 (12 oz.) pkg. Johnsonville 3 Cheese Italian Chicken Sausages with Red Bell Pepper & Garlic, sliced into
-
12 slices each
-
1 Tbl. oil
-
1 Tbl. butter
For Sauce:
- 2 Tbl. butter
- 2 large shallots or 1/2 of a small onion, chopped
- 2 cloves garlic, minced
- 2 Tbl. flour
- 1 cup milk
- 1 cup heavy cream, (can sub milk if desired)
- 1/3 cup beer
- 1/2 tsp. Better Than Bouillon Chicken Base
- 1 Tbl. + 1 tsp. whole grain mustard
- 1 tsp. extra hot horseradish
- 1/2 tsp. white pepper
- 1/2 tsp. Worcestershire sauce
- 1/8 tsp. cayenne
- 3/4 lb. extra sharp cheddar, grated
- 1/2 cup finely grated Pecorino Romano cheese
- 4 oz. Velveeta, diced
- 1 Tbl. cornstarch mixed with 1 Tbl. cold beer
- 2 1/2 cups uncooked pasta, small shapes such as cellentani or macaroni
For Topping:
- 4 Tbl. butter, melted
- 1 1/2 cups Snyder’s Honey Mustard & Onion Sourdough Pretzel Nibblers, crushed (measure before crushing) or as desired
Instructions:
-
In a large saucepan or small pot, add 2 Tbl. butter and melt over medium heat. Add shallots and garlic and sauté for 1-2 minutes. Add 2 Tbl. flour and cook, stirring for 2 more minutes.
-
Slowly add milk, cream and beer, whisking in until lump-free.
-
Add chicken base, mustard, horseradish, white pepper, Worcestershire and cayenne.
-
Cook and stir until mixture comes to a boil. Stir and boil 1 minute.
-
Add cornstarch and beer slurry, and stir until thickened.
-
Turn down heat and add cheeses, stirring until fully melted.
-
Fold in sausage. Remove from heat, cover with lid tilted and set aside.
-
Preheat oven to 350º F.
-
Cook pasta for 1 minute less than recommended for al dente. Drain well. Stir into cheese and sausage sauce.
-
Grease a 2 1/2 qt. casserole dish with lid. Fill with mac ‘n cheese mixture. Cover and bake for 35-40 minutes.
-
In small bowl toss together melted butter and crushed pretzels. Remove casserole from oven, evenly sprinkle buttered crushed pretzels over mac ‘n cheese.
-
Pop back into oven and bake, uncovered, another 5 minutes.
LET REST for 15-20 minutes before serving so that casserole can cool down a little and fully thicken.

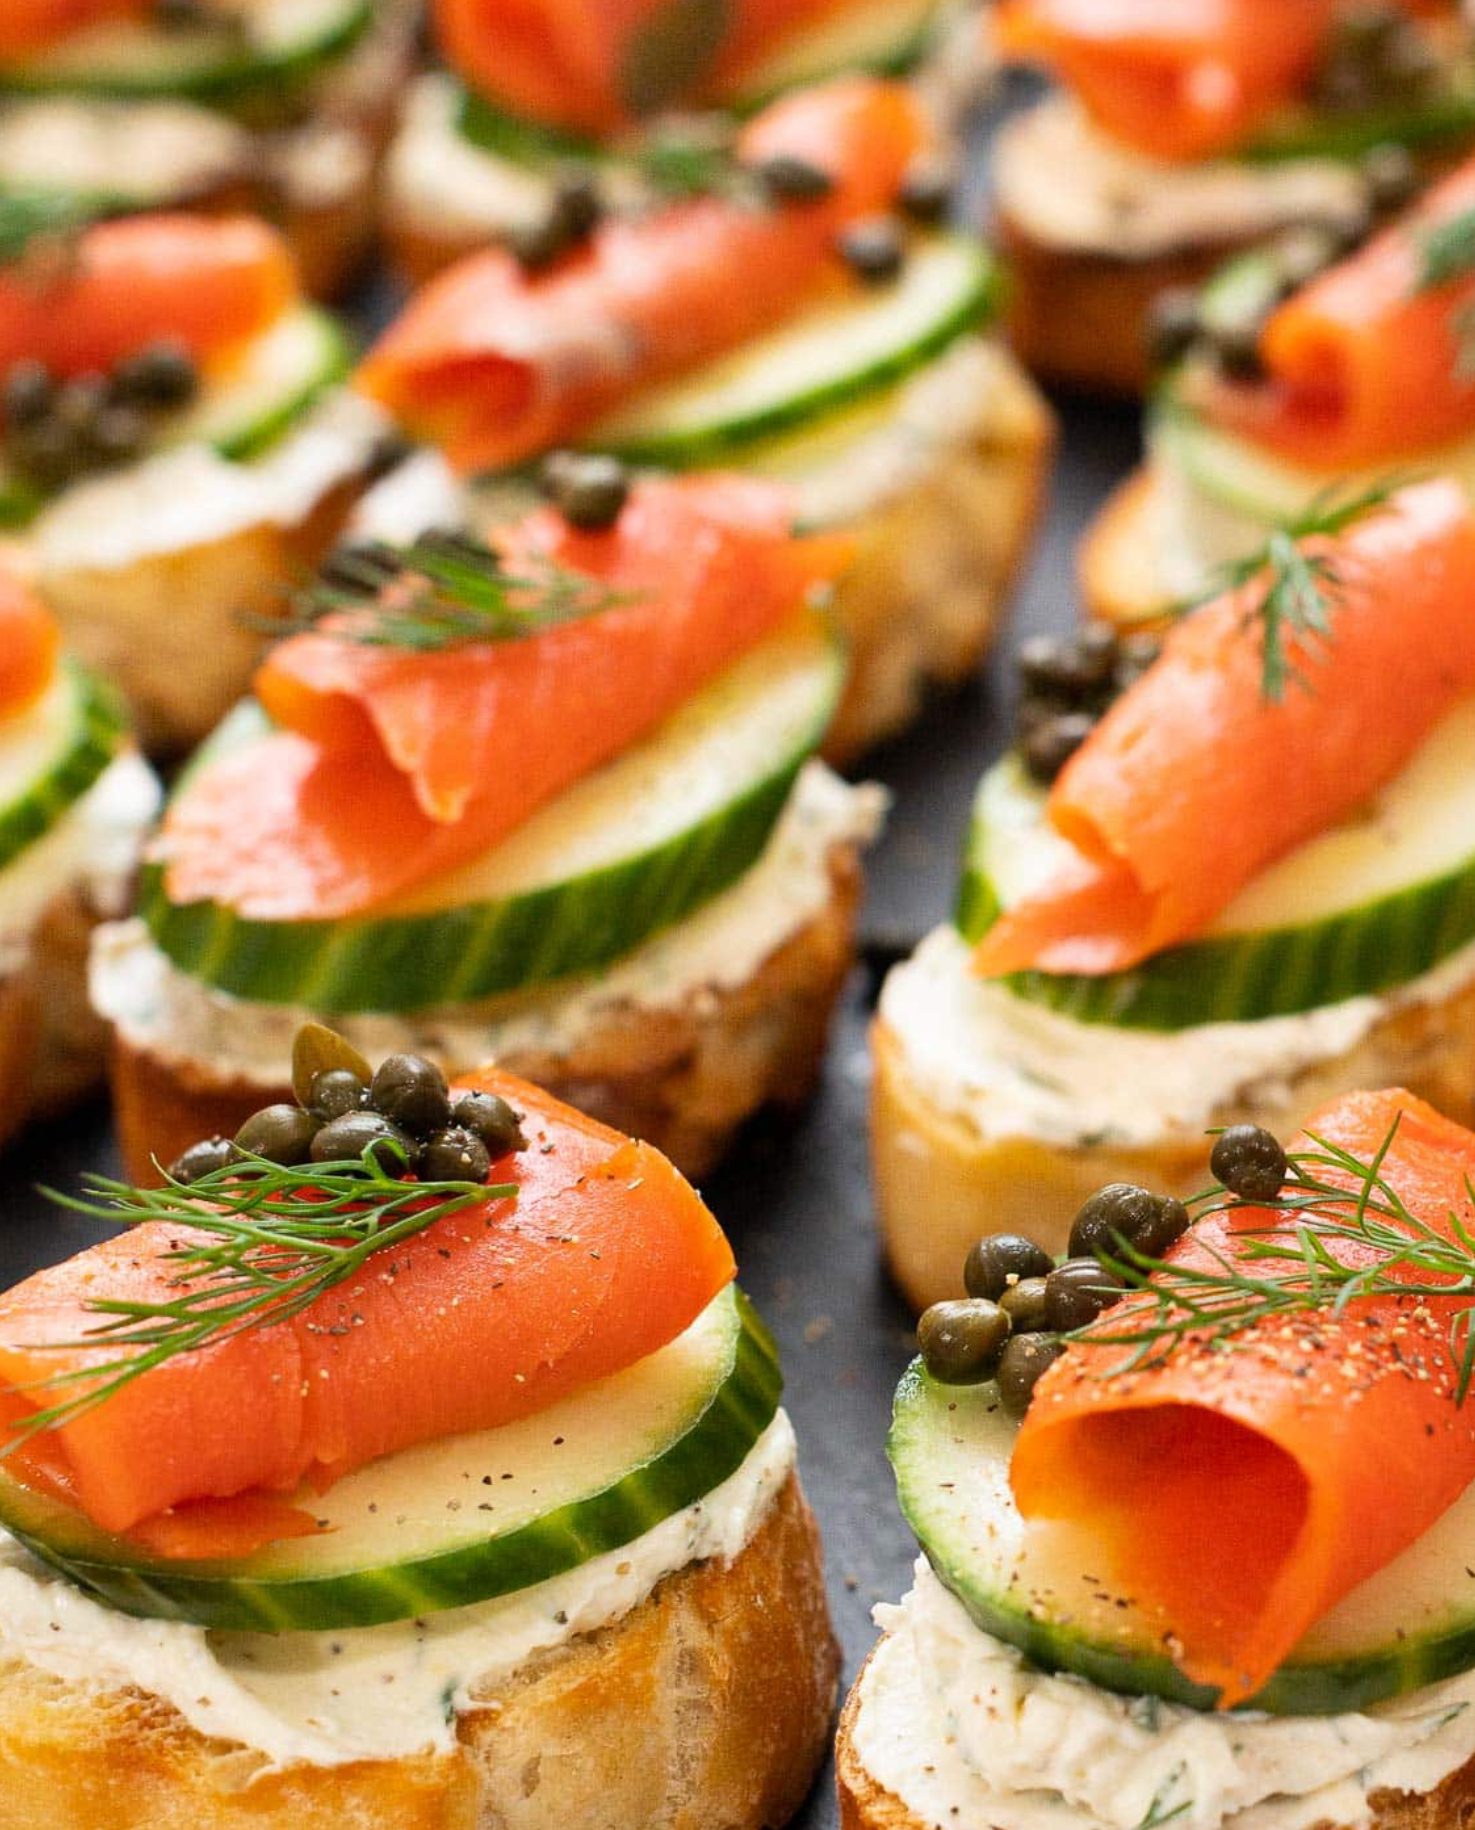
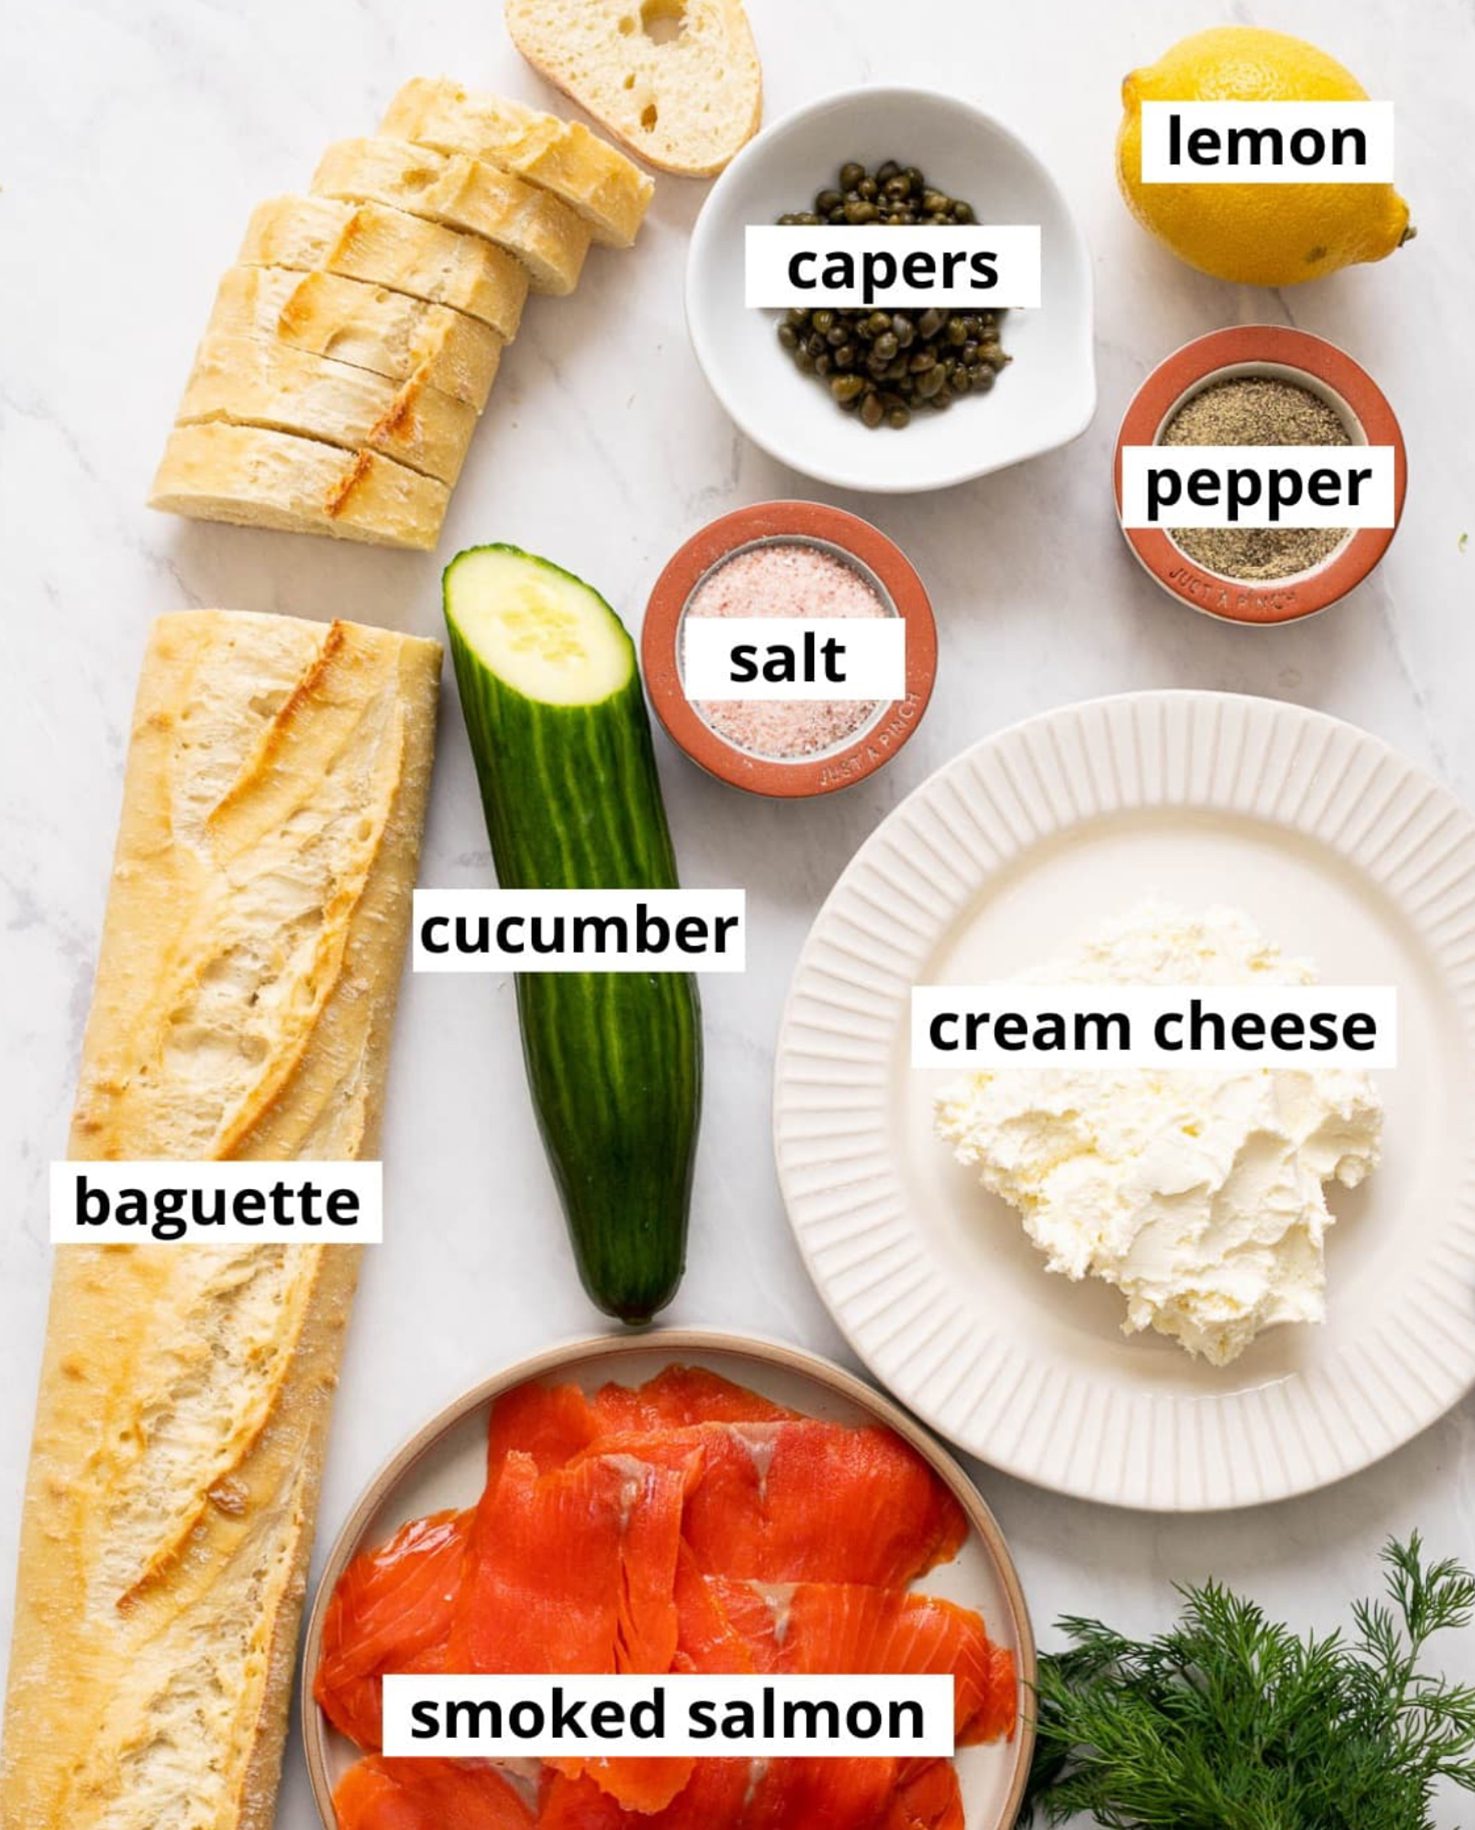
Smoked Salmon Crostini
This summer has been crazy… in all the best possible ways. We have witnessed new beginnings at a wedding, the birth of a dear friend’s grandchild, our kiddos’ friends buying homes, and some starting their own families. It has been a season of celebrations, parties, and picnics, and with that, you know this girl is not showing up without a little bit of something to share, so let’s bring on the apps! The bite-sized morsels of goodness that I could seriously live off of. Now, while loving a platter or nachos and a big bowl of any kind of dip (check out my recipe for caramelized onion dip. It’s addicting.), there are soooo many options when it comes to shareable snacks. I will do a post on my favorites at a later date, but let me start with the one that has been my go-to.
Smoked Salmon Crostini. It is elegant, delicious, and 90% assembly of premade ingredients, which takes you out of the hot kitchen or galley and lets you enjoy the time with your friends. This is definitely one that will stay on repeat! I got this recipe from iFoodReal. Their description and directions are spot on, so I am just going to send them your way for this one…
ifoodreal.com/smoked-salmon-crostini
Ingredients:
-
1 baguette, sliced into 1/2-inch rounds
-
Olive oil spray or brush
-
8 oz cream cheese, softened (or use whipped cream cheese)
-
2 tablespoons fresh dill, chopped
-
1 tablespoon lemon juice
-
8 oz smoked salmon
-
Capers (optional)
-
Freshly ground black pepper
Instructions:
-
Toast the baguette slices: Preheat oven to 400°F. Lightly spray or brush the baguette slices with olive oil and bake for about 7–10 minutes, or until golden and crisp. Let cool.
-
Make the cream cheese spread: In a bowl, mix softened cream cheese with chopped dill and lemon juice until smooth.
-
Assemble the crostini: Spread each toasted baguette slice with the dill cream cheese, top with a small slice of smoked salmon, and garnish with a few capers and freshly ground black pepper.
-
Serve immediately or refrigerate until ready to serve (best enjoyed the same day).
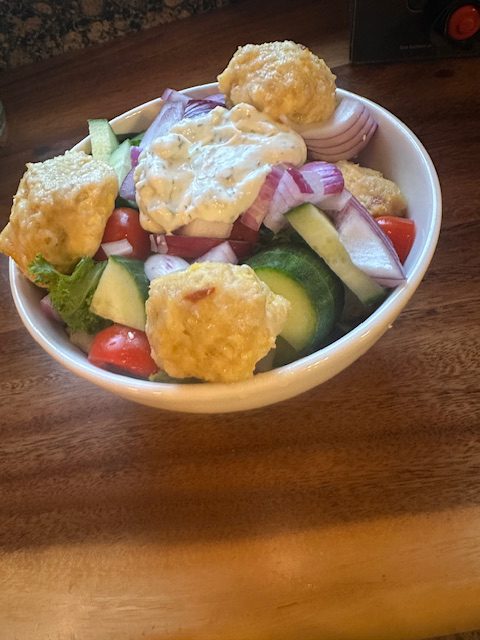
Chicken
Chicken Meatballs
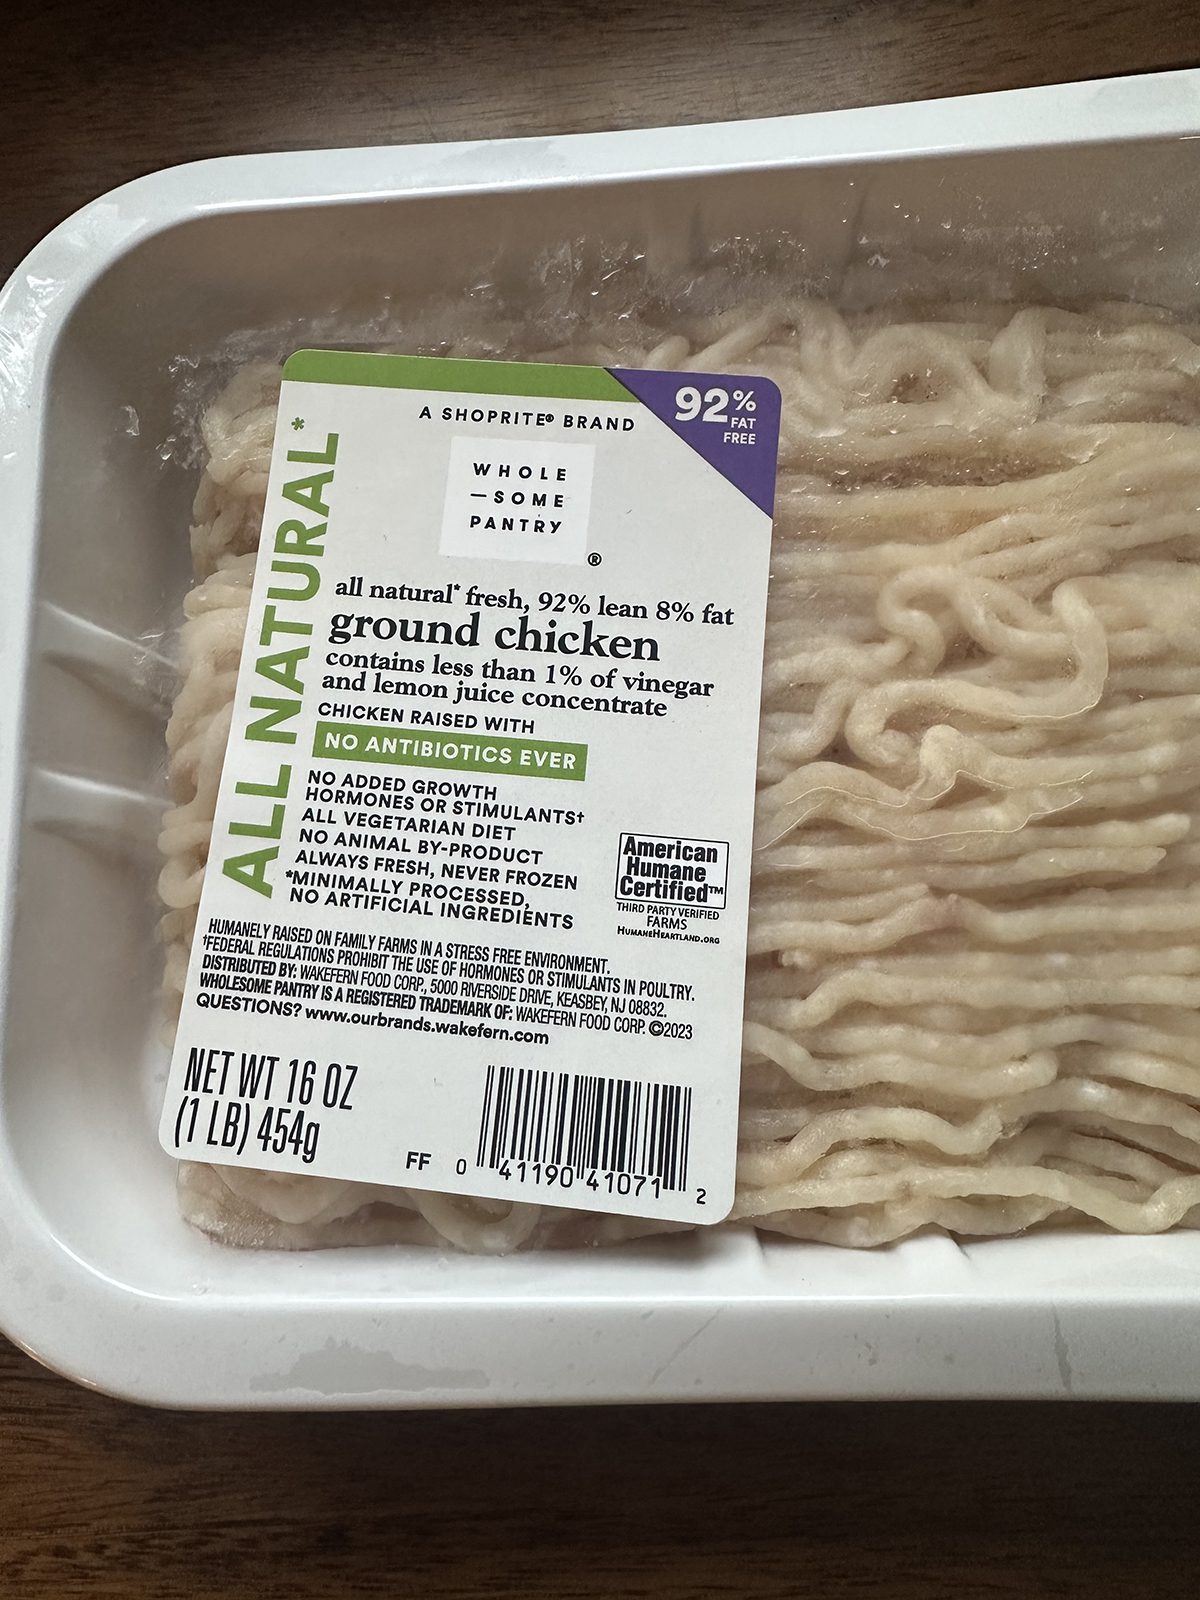
My new favorite thing to keep in the fridge and freezer. When I say you may not find a more versatile staple to have around, I’m not exaggerating. As you know, chicken is the base for a wide array of recipes. It’s a basic, palatable protein that’s healthy and, for the most part, cost-effective.
When cooked on the bone and with the skin on, it can have a lot of flavor on its own. Take those away, and you might end up with a bland taste and dry texture. But using it ground and adding a few simple ingredients opens the door to a quick and delicious meal. This is definitely staying on our boat meal rotation this summer!
Now let’s dive into the meat of this recipe and get the ball rolling (Sorry, I couldn’t resist that one…).
The Ingredients
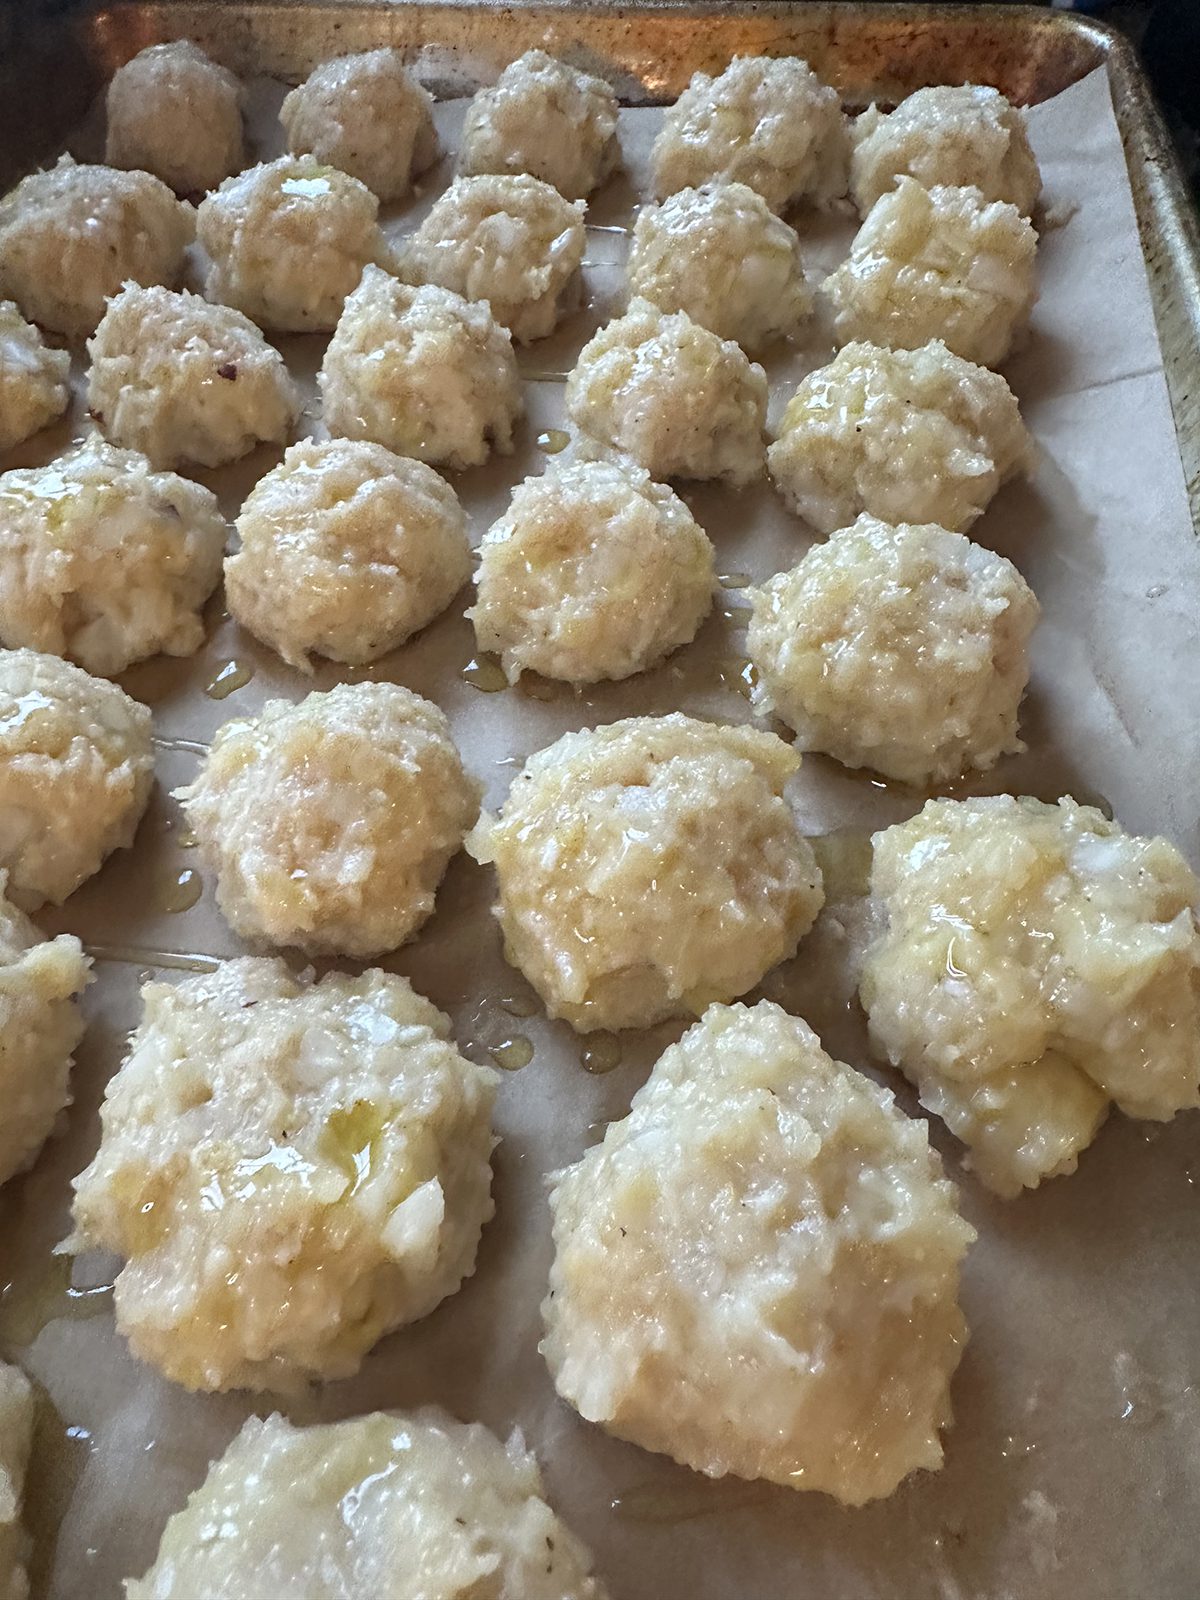
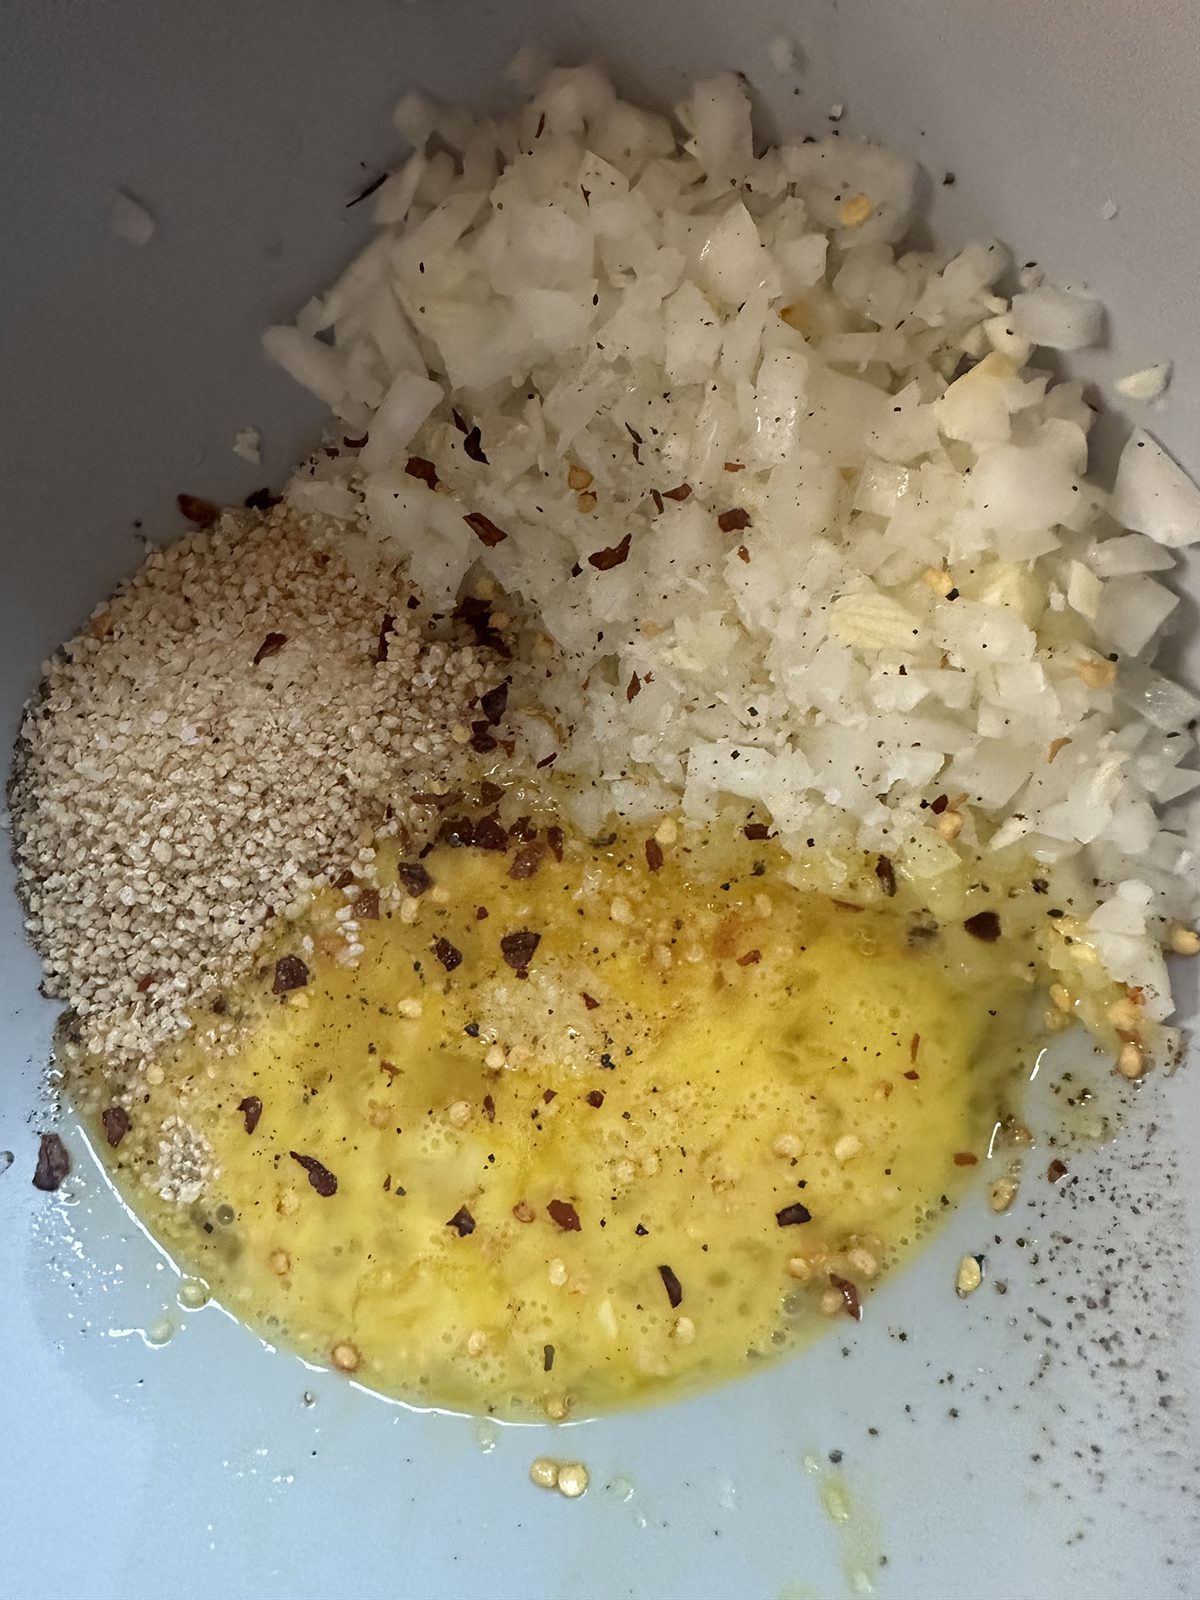
Chicken Meatballs (makes about 25 small meatballs)
-
2 packages of ground chicken
-
3 cloves of garlic, minced
-
2 medium white onions, finely chopped
-
1/2 cup unseasoned breadcrumbs
-
2 eggs, beaten
-
2 teaspoons salt
-
2 teaspoons crushed red pepper flakes
The Directions
-
Preheat your oven to 350°F.
-
Line a sheet pan with parchment paper (or lightly oil it).
-
In a large bowl, combine all the ingredients. Be careful not to overmix to ensure a tender consistency.
-
Form the mixture into small balls—think ping-pong or golf ball size. An ice cream scoop works well for this.
-
Bake for about 30 minutes, until the internal temperature reaches 165°F.
-
Let cool, then transfer to a container or zip-top bag for storage.
These will stay fresh in the fridge for 3–4 days, or in the freezer for up to 3 months. If freezing, I suggest flash-freezing them on a cookie sheet lined with parchment for 3–4 hours. Once solid, transfer them to a storage bag. You can then pull out only as many as you need for each recipe. If you have the space, double the batch—you’ll be surprised how often you reach for them!
Now, Let’s Talk Sauce
Because let’s be honest—it’s all about the sauces. These meatballs are neutral enough to pair with just about any cuisine. Below are a few of my favorites, adapted from the Half Baked Harvest cookbook and Giadzy. (They often include extra ingredients like ginger for the Asian-style versions—but I keep mine basic to batch-cook and tweak flavors later.)
Favorites from Half Baked Harvest:
From Giadzy:

Cajun Corn and Shrimp Chowder
As we move into June and a slew of social engagements fill our calendars—from graduation parties to picnics—we’re often hit with the same old question: What will I make? What dish feeds a crowd without breaking the budget? What guarantees you’ll come home with an empty pot?
It’s this dish.
Let’s start with a simple fact: everyone loves chowder. For more years than I can count, every time I’ve been invited to or hosted a summer party, I’ve been in charge of the clam chowder. It was my father’s go-to recipe for years, and after he felt like he’d perfected it, he passed it on to us kids.
Through the years, I’ve played around with it a bit (Fatback? Yep. Hard to find. Bacon is easier!), but I also realized that fresh, chopped clams aren’t always readily available—and, honestly, I was ready to switch things up.
Enter your new favorite chowder.
I’ve made this more times in the past year than I can count and am finally ready to share the embarrassingly easy recipe. It’s less about cooking and more about prepping and assembling.
The best part? It’s budget-friendly, feeds a crowd, and tastes like something much more labor-intensive.
The Ingredients
-
(Portions based on 30–40 one-cup servings)
-
2 packages of turkey kielbasa
-
2 packages of frozen cooked medium shrimp
-
2–3 tablespoons unsalted butter
-
1 large white onion
-
1 each of red, yellow, and orange bell pepper
-
3 bags of frozen corn
-
3 cans of cream-style corn
-
1 bag of baby potatoes or 4 large Yukon Gold potatoes
-
1 carton vegetable broth
-
1/4 cup heavy cream
-
Cajun seasoning to taste
-
The Directions
Food Prep
-
Slice the kielbasa in half lengthwise, then again to make four strips per package. Cut into 1/2-inch bite-sized pieces.
-
Finely dice the peppers and onion.
-
Thaw the shrimp under cold running water, pat dry, and remove the tails.
-
If using Yukon Gold potatoes, peel them. (You can leave the skin on baby potatoes.)
-
Dice the potatoes to roughly the same size as the kielbasa.
-
Defrost the corn.
Cooking
-
Melt the butter in a heavy-bottomed pot. Sauté the peppers and onion until soft.
-
Sprinkle in two tablespoons of Cajun seasoning. Add the kielbasa and cook until it starts to brown slightly.
-
Add the corn and half the broth. Let it all simmer on low heat.
-
In a separate pot, boil the potatoes until they can be easily pierced with a knife. Drain thoroughly.
-
Add the potatoes to the chowder. Stir gently.
-
Adjust the consistency by adding more broth until it’s the texture you like.
-
Stir in the heavy cream and taste for seasoning. Add more Cajun spice if needed.
Notes & Tips
🌽 Fresh corn on the cob? If you have the time, roast it on the grill or in the oven at 425°F until tender. Cut the kernels off and toss them in—drop the cobs into the broth to simmer for even more flavor.
🌶️ Spice things up: Andouille sausage makes a great swap for a smaller batch. It’s spicy, smoky, and totally Cajun. Want even more heat? Add a roasted jalapeño.
🧂 Season with restraint: This dish is personal and flexible. I gave you the basics, but you can always build layers of flavor—just remember, it’s easier to add than take away.
Whether you’re feeding the neighborhood or just want leftovers that make you happy all week, this chowder is a crowd-pleasing, low-effort win.
Let me know if you try it—or what you change to make it yours!

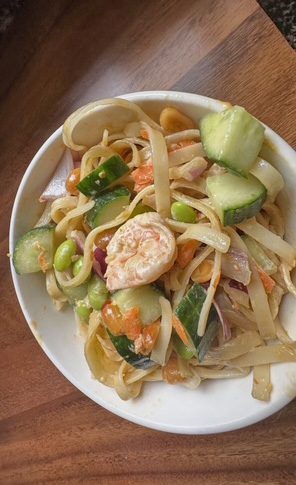
Thai-Inspired Rice Noodle Salad
The other day, I fell down the recipe rabbit hole. After a month of eating heavy birthday dinner meals—think monster pork chops, mashed potatoes, Bolognese, pasta galore—I needed to lighten things up and return to a healthy cooking routine. I also did not have the energy to prepare any complicated dishes. When I came across this dish, I was immediately enthralled. While I took certain liberties with the original recipe, it still came out fantastic. And when I say easy and cheap (I did have many ingredients in my pantry), I am not kidding. The whole meal was put together in under 15 minutes, made enough for lunches within easy reach for a few days, and was absolutely delicious. This will definitely be a staple in our house—and one I plan to play around with using different proteins in the future. For now, let me tell you what I did.
The Ingredients
-
1 package of rice noodles
-
1 medium red onion, diced
-
1 large carrot, shredded
-
1 English cucumber, sliced and quartered
-
1 bag of shelled edamame
-
1 Serrano pepper, sliced thin (or jalapeño—your heat, your choice!)
-
1/2 cup chopped green onions
-
1 cup shredded red cabbage
-
1/2 cup roasted peanuts
-
1 package of flaked imitation crab meat
-
1 bag of medium to large peeled and deveined shrimp
-
Soy sauce or tamari, to taste
The Dressing
-
1 bottle of ginger dressing
-
2 tablespoons of wasabi sauce
-
1/4 cup Kewpie mayonnaise
-
A few splashes of soy sauce or tamari, to taste
The Directions
-
Defrost shrimp if using frozen.
-
Cut and shred veggies.
-
Steam your shrimp for approximately 5–10 minutes.
-
Boil rice noodles. Drain and lightly toss with oil. (I love sesame oil for this, but any neutral oil will work to prevent sticking!)
-
Spread cooked noodles out onto a sheet pan to cool.
-
Add seafood, veggies, noodles, and dressing to a large bowl and toss to combine. Check seasonings and adjust to personal taste.
-
Finish with a sprinkle of peanuts and scallions.
Notes
-
This is an absolute make-ahead recipe. It can be stored covered in the fridge for up to three days. If making in advance, I would hold the peanuts and scallions until serving.
-
I use low-sodium soy so I can adjust the salt level myself.
-
The combination of base noodles and veggies would work beautifully with poached or roasted salmon on top.
-
If you’re not a seafood fan, replace the seafood with cubed or sliced chicken. I would not recommend rotisserie chicken, as the flavor would take away from the delicate flavors of the noodle and veggie combination.
-
I give the soy/tamari option due to celiac or gluten sensitivity.

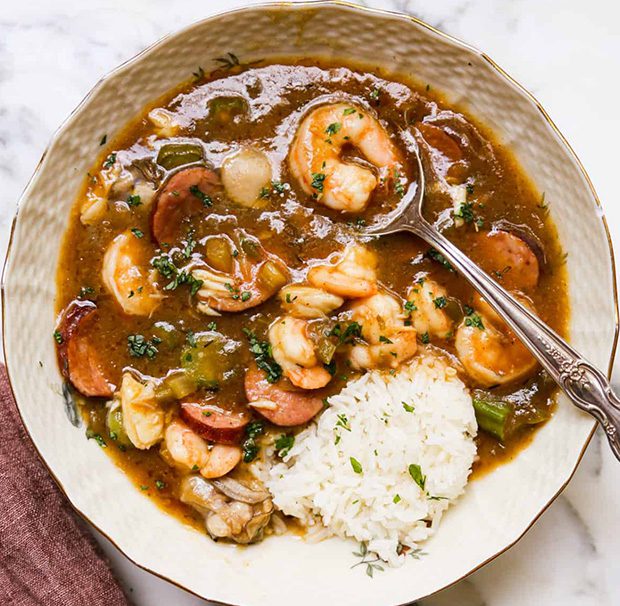
Gumbo
I don’t know if you’re going to love me for this one or be mad at me for introducing you to it so close to warmer weather and bathing suit season, but I will say this… crème brûlée French toast is everything you want in a single bite. It’s dessert for breakfast. How can you be mad about that?
My husband LOVES crème brûlée. For as long as I can remember, if it was on a dessert menu, he had to have it. When we were younger and still testing our culinary waters, this was not something I ever thought about attempting. Between the smooth custard and the hardened sugar layer on top, it seemed like something only to
I have recently developed a traveling bug. Well, more like traveling symptoms because I feel like I want to go somewhere adventurous and new, but then my fear of flying kicks in, and I put it on the back burner. What I try to do, however, is explore the places through their food. For this culinary trip, I wanted to go to the Big Easy. That’s right, New Orleans. So let me pretend for a bit it’s Fat Tuesday instead of Chunky Friday, throw on some jazz music, and do some arm stretching because this roux is going to give me a workout. But you know what they say… no pain, no gain.
So, what is the dish that speaks to this heritage to me? Gumbo. Let’s dig in.
The Ingredients:
- 1 medium green bell pepper
- 1 medium yellow onion
- 3 stalks of celery
- 6 cloves of garlic
- Creole seasoning (I like Slap Ya Mama)
- 2 teaspoons dried thyme
- 2 bay leaves
- 1/2 teaspoon cayenne pepper, plus more as needed
- 1 pound boneless, skinless chicken thighs (feel free to substitute rotisserie chicken here)
- 1 1/2 teaspoons of salt and pepper
- 1 package of andouille sausage or 2 packages of turkey kielbasa
- 1/4 cup of neutral oil
- 6 cups low-sodium chicken broth (room temp)
- 2 teaspoons filé powder (optional, see notes below)
- 1/2 stick of unsalted butter
- 1/2 cup all-purpose flour
Directions:
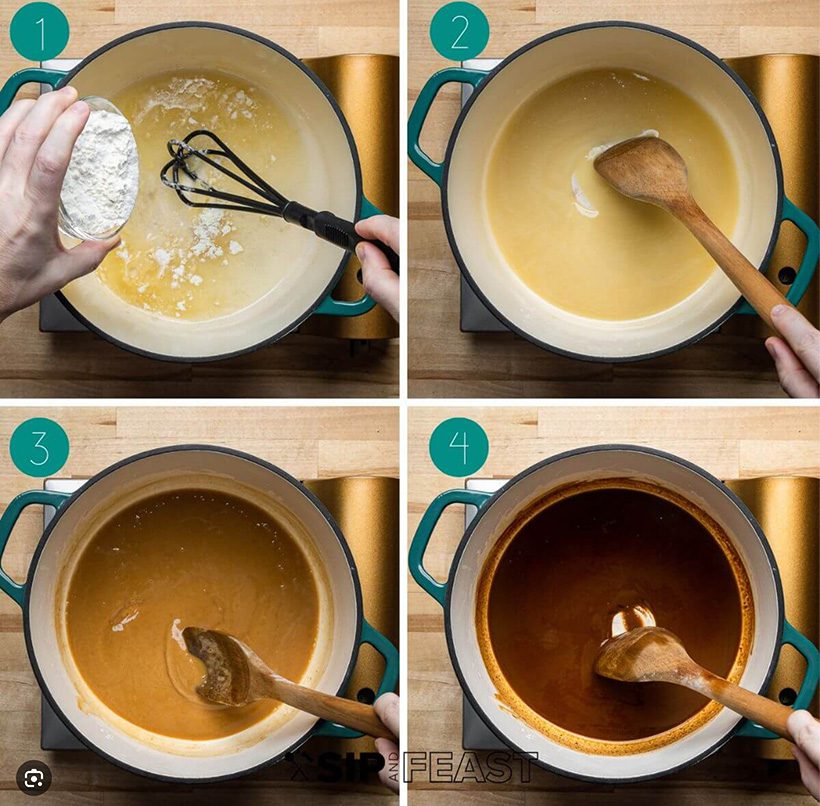
Make the Roux
In a large, heavy-bottom stock pot, combine flour and oil. Cook on medium-low heat, stirring constantly for 30–45 minutes. This part takes patience… when it’s finished, it should look like dark chocolate and be the consistency of a soft cookie dough. Don’t walk away from this pan—it can burn quickly! Believe me, this can happen quickly.
Cook Your Proteins
In a cast iron pan or flat top grill, brown your sausage or kielbasa and set aside. In the meantime, add your shrimp, lightly dust with the Creole seasoning, and cook until pink. Now, you can add the chicken and cook for about 5–7 minutes per side, or until it reaches an internal temperature of 165 degrees. You can (as I have done) layer the thighs in a sprayed loaf pan and pop it into a preheated 375-degree oven for about 30–45 minutes until it reaches the proper temperature. After letting it rest, cut into thick slices. It will continue to break down and shred when added to the base.
Cook the Vegetables
Deglaze your protein pan with 1/2 cup of the chicken broth to remove any bits left behind. Wipe out your pan and add 1/4 cup of oil and your peppers, onions, and garlic. Cook until soft and set aside.
Put It All Together
When the roux is finished (finally!), add the remaining 5 1/2 cups of chicken broth, veggies, and proteins. Let simmer for about 15 minutes or so until everything is combined. Add more of your Cajun seasoning and adjust to taste.
Final step
Let the gumbo cool and place it in your fridge, and forget about it for a day. While you can certainly eat it right away, it definitely tastes better when it has developed over 24 hours. This actually makes it a perfect dish for entertaining, as all you have to do when company comes is gently reheat it, cook some white rice, and call it a day. I keep mine in the fridge for 3 days, and then, if it’s not devoured, vacuum pack and freeze the leftovers in single-serving portions for a quick lunch or dinner.
Notes
Filé powder is made from sassafras leaves and is used as an additional thickening agent. If you cannot find it in your local supermarket, it is available on Amazon. You can also substitute thyme for the herbaceous note, but if this is a dish you want to keep in your repertoire (and you should!), it’s worth it to make the purchase.
If you are celiac or gluten intolerant, this recipe works well with gluten-free flour.
Want a cheat? As I mentioned above, you can add a rotisserie chicken, but frozen shrimp (defrosted before adding) could also be a substitute. I have to say… please don’t use both. Pick a shortcut, but take the time to nurture the rest. The love you put into it makes all the difference.
Crème Brûlée French Toast
I don’t know if you’re going to love me for this one or be mad at me for introducing you to it so close to warmer weather and bathing suit season, but I will say this… crème brûlée French toast is everything you want in a single bite. It’s dessert for breakfast. How can you be mad about that?
My husband LOVES crème brûlée. For as long as I can remember, if it was on a dessert menu, he had to have it. When we were younger and still testing our culinary waters, this was not something I ever thought about attempting. Between the smooth custard and the hardened sugar layer on top, it seemed like something only to be executed by those highly skilled. Once I got some kitchen confidence, I decided to tackle it. Guess what? It’s not that difficult to make. But…I’m digressing.
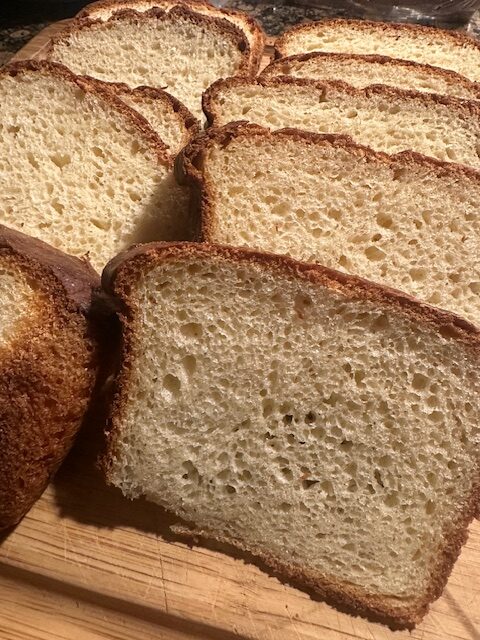
The guy also loves his French toast, so for Easter this year, I thought I would try to do the mash-up. I got a loaf of beautiful bread from a local bakery, sliced it into about 1-inch pieces, and then soaked it in heavy cream and eggs before layering them on top of a mixture of melted brown sugar and butter. I let mine sit overnight for an easy morning where I can just pop it in the oven for an hour and spend time with the family instead of doing all the prep. Ready to dig in? Let’s go!
The Ingredients:
-
6 tablespoons of butter
-
¾ cup packed light or dark brown sugar
-
2 tablespoons maple syrup
-
6 to 8 1-inch-thick slices of a loaf of French bread or brioche — honestly, use whatever bread you have and love
-
6 large eggs
-
1–2 cups half-and-half
-
1 tablespoon vanilla extract
-
¼ teaspoon salt
-
Whipped cream + fresh berries for topping
Directions:
-
-
Add butter, brown sugar, and maple syrup to a pan over medium heat and gently heat until dissolved. Do not walk away from this step, as sugar can burn quickly. You can also microwave it for 1–2 minutes. I prefer the stove to have more control over the process, but if you’re in a pinch, a quick melt will work.
-
Lightly grease a 9×13-inch pan with cooking spray.
-
Spread the brown sugar mixture in the bottom of the pan and arrange the bread slices in a single layer over the top.
-
In a bowl or liquid measuring cup, whisk together the eggs, half-and-half, vanilla, and salt.
-
Pour the mixture evenly over the bread.
-
Cover the pan and refrigerate overnight (about 8–10 hours).
-
Remove the pan from the refrigerator, uncover, and place it in a cold oven. Preheat the oven to 350°F. Once the oven reaches temperature, bake for 30–35 minutes, until the bread is golden and the caramelly syrup is bubbling. (Alternatively, if you want the golden syrupy goodness on top, bake the French toast for 20 minutes, then use a large, flat spatula to flip the bread pieces and bake for another 10–15 minutes.)
-
Serve warm with whipped cream and fresh berries. I love raspberries with this, but strawberries or blueberries would be delicious as well.
-

SG Recipe Special Edition
Cooking on a Budget
Frugal Foods
This week, I’m changing tack! Instead of featuring one particular dish, I’m offering up ideas and suggestions on how to cook with three main objectives in mind:
-
Quick
-
Easy
-
Affordable
Why am I trading my filets for ground meat? My roasted asparagus with shallots and bacon for frozen veggies? For the past two weeks, I’ve challenged myself to cook on a budget. It all started when a new destination popped up on my radar—too exciting to pass up!
You see… over the past year or so, I’ve been working on launching Waypoint Life Coach, my new business. If you’ve ever tried to start something from scratch, you’ll know that the spark of an idea quickly turns into months (or years) of getting it off the ground. I was feeling overwhelmed—or if I’m staying on theme here, overloaded—so I sought counsel from professionals to help get me back on track. Or, as they say in the coaching biz… to find my niche.
Well, my friends, I’ve found it—and I’ve hoisted my spinnaker to run with it.
Is your anticipation driving you crazy yet?
Let me introduce you to Keep It Real (Estate)—a program designed to help first-time homebuyers navigate the process. Part of this initiative includes coaching and guidance on how to eat well while sticking to a budget. After some smart and frugal shopping and several rounds of recipe testing, I bring you: Frugal Foods (name still being workshopped).
The criteria?
-
Quick to prepare
-
Uses frozen and shelf-stable ingredients
-
Under $5 per serving
-
And most importantly—delicious
So tighten up that wallet, and let’s go!
The Ingredients:
-
3 tbsp olive oil
-
4 cups cherry tomatoes
-
1 tsp salt
-
1 tsp pepper
-
½ of an onion, thinly sliced
-
2 cloves garlic
-
1 block full-fat sheep’s milk feta
Pantry Staples
-
Rice
-
Instant mashed potatoes
-
Broths
-
Dried herbs and spices
-
Canned goods
-
Sweet potatoes
-
White potatoes
-
Peppers
-
Onions (red and white)
-
Coconut milk
The Fridge
-
Fresh vegetables (spinach, broccoli, carrots)
-
Lean meats (chicken breast, ground turkey, ground chicken)
-
Rotisserie chickens
-
Greek yogurt
The Freezer
-
Shrimp
-
Salmon
-
Chicken breast
-
Chicken thighs
-
Ground sausage
-
Ground beef
Where to Shop
-
Costco
-
Aldi
-
Your favorite grocery store for specialty items
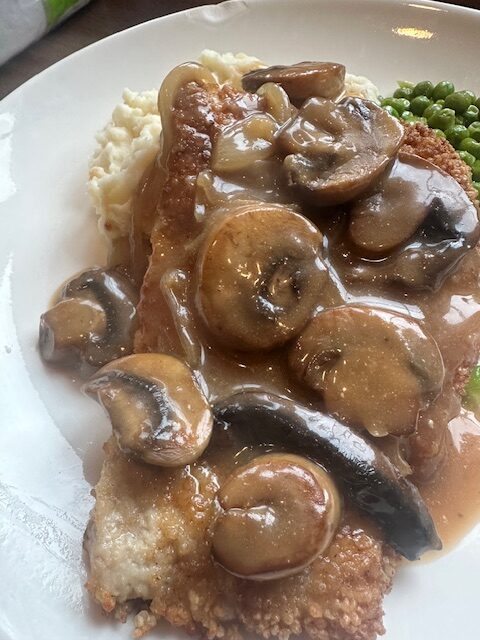
Here’s a meal the hubby made tonight—it was a winner, winner, cube pork steak dinner!
The Ingredients
-
4 pork cube steaks ($2.75 each)
-
2 eggs
-
1 cup breadcrumbs (pantry pull)
-
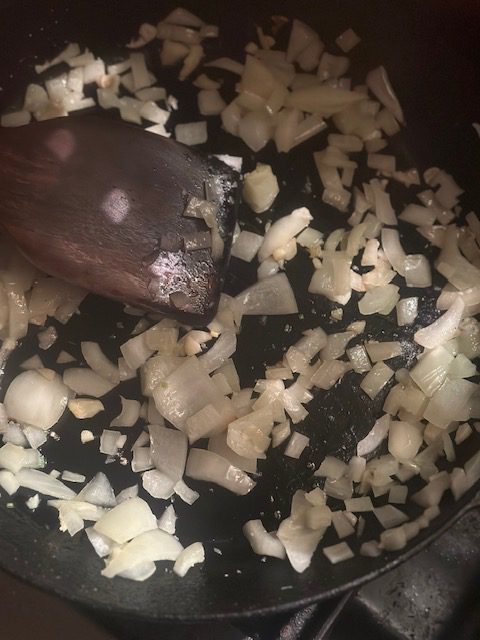
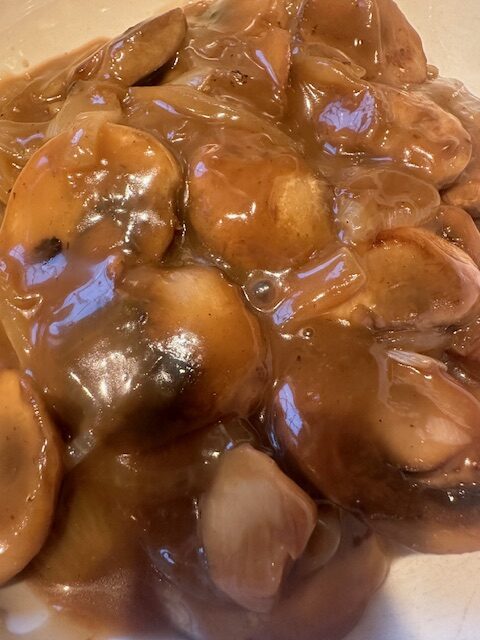
1 package sliced mushrooms
-
1 yellow onion, sliced (pantry pull)
-
1 jar pork gravy
-
1 container premade mashed potatoes
The Directions
Step 1 – Prep the Pork
Season steaks with salt and pepper.
Dredge pork in egg, then in breadcrumbs. Set aside.
Step 2 – Make the Gravy
Sauté mushrooms and onions over medium heat until soft. Add the jar of gravy and stir until warm.
Step 3 – Heat the Potatoes
Follow microwave directions on the mashed potatoes container.
Step 4 – Cook the Pork
Heat oil in a large sauté pan, then add 1 tbsp of butter (to lower the smoke point and boost flavor).
Cook pork steaks for 3–5 minutes per side, depending on thickness.
Doneness Tips:
Use a meat thermometer if you’re unsure. Pork steaks should reach 145°F. If using ground pork patties instead, cook to 165°F.
Tomatoes and Feta
I have been spending some time flipping through my 200+ saved recipes, looking for ideas for a new series I’m creating to help young adults who are moving into their first homes shop and prepare easy, cost-efficient dishes while still enjoying a delicious and beautiful meal. I could not resist including this one. The simplicity and quick cooking time are winners, along with the fact that it is absolutely delicious! With a handful of easily sourced ingredients, quick cooking time, and money-saving appeal, this dish will stay in everyone’s dinner rotation. So, preheat your oven and start setting the table, because dinner will be ready in about 30 minutes.
The Ingredients:
-
3 tbsp olive oil
-
4 cups cherry tomatoes
-
1 tsp salt
-
1 tsp pepper
-
½ of an onion, thinly sliced
-
2 cloves garlic
-
1 block full-fat sheep’s milk feta
The Directions:
In a casserole pan, toss the cherry tomatoes with the olive oil, salt, pepper, onion, and garlic. Make a well in the middle of the pan and place the block of feta in it. Place it in the oven and roast for 20-30 minutes until the tomatoes have burst and the feta has reached a slightly golden-brown color.
Remove from the oven, and with a fork, gently break up the feta and mix with the tomatoes until you have achieved a rustic sauce.
Ways to Serve:
-
Tossed with your favorite pasta
-
Over rice
-
Inside of a roasted half of spaghetti squash (This will take about an hour of prep time, but it’s so worth it! Roast cut side down until tender, then gently pull the squash flesh with a fork to create a spaghetti-like texture.)
-
As an appetizer with crostini or a sliced baguette
Add-On Proteins:
-
Roasted Shrimp
-
Chicken
-
Pork
-
Veal
-
Served on top of salmon, accompanied by a side of spinach
Have fun. Experiment. Enjoy!
Irish Potato Skins
The luck of the Irish is with you today because I am going beyond the beloved Reuben and turning your leftover corned beef into a bite you will want to eat well after the glow of St. Patrick’s Day is over. It has all the flavors and comfort of the traditional holiday meal but stuffed into a crispy shell and loaded with cheese. Do yourself a favor and scoop up a few extra packets of meat when they go on sale—you’ll be happy to have them around for all the delicious meals you can make.
We did a traditional meal last night (pics below) and had the potato skins for lunch today. Let me tell you… this dish will certainly be the pot of gold you’ve been looking for!
Sláinte!
Ingredients (This recipe is based on 4 potato skins.)
- 2 medium russet potatoes, scrubbed clean
- 1 block of Swiss cheese, grated
- 1 small onion, diced
- 2 tablespoons unsalted butter
- Toppings: Russian dressing, sauerkraut, green onion
Step 1: Cook the Corned Beef
You can cook corned beef in three different ways, depending on your time and equipment:
- Traditional stovetop boil
- Crockpot
- Instant Pot
I’m not going to impart my wisdom here on the best practices for each when the Food Network broke it down so nicely. I will say, I’ve been favoring the Instant Pot method. In 90 minutes, I get a tender piece of meat without any worries.
Now, I know many people are wary of the Instant Pot. My own Bermuda racing husband won’t even open the lid. That’s okay—this girl likes to live on the wild side and takes on that challenge. You pick what works best for you. The end product is important, not the process in this case.
Best Way to Cook Corned Beef – Food Network
Step 2: Bake the Potatoes
Rub your potatoes with olive oil and sprinkle with salt. Bake at 425°F for about an hour or until they can be easily pierced with a sharp knife. Let them cool, then cut lengthwise and scoop out the filling, leaving a layer of potato on the bottom to keep the skin intact.
Step 3: Combine the Filling
Mix the scooped-out potato, chopped corned beef, half of the shredded cheese, a few tablespoons of diced onion, and the melted butter.
Step 4: Assemble the Skins
Add a layer of the mixture to each skin and top with the remaining cheese.
Step 5: Bake & Serve
Place them back in the oven until the cheese has melted, then add your favorite toppings.
Note:
The ratios of the filling can be adjusted to your preference. It will be delicious however you build it—just have fun and enjoy!
Other Ideas:

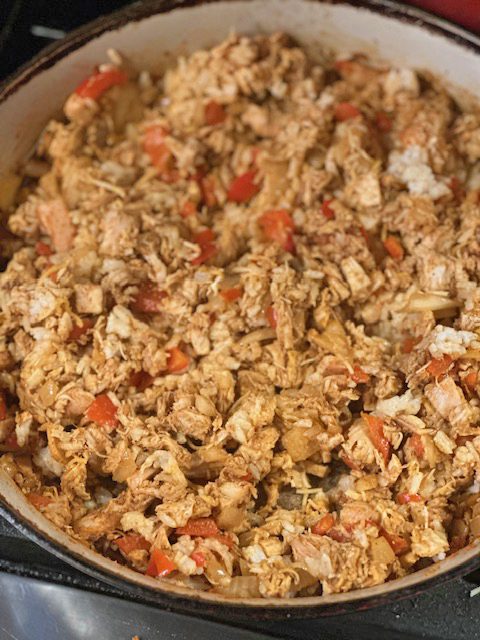
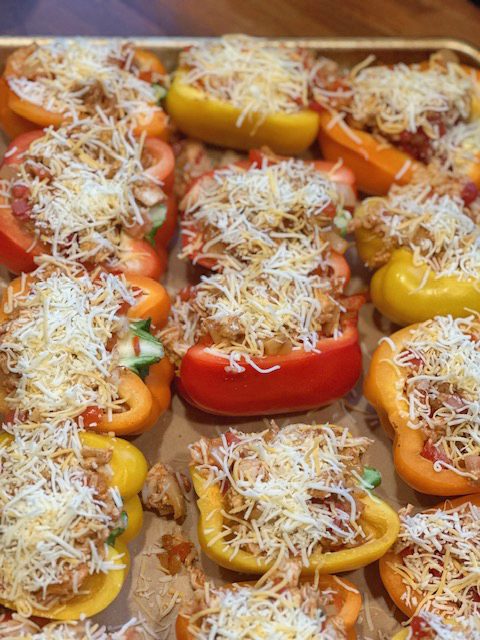
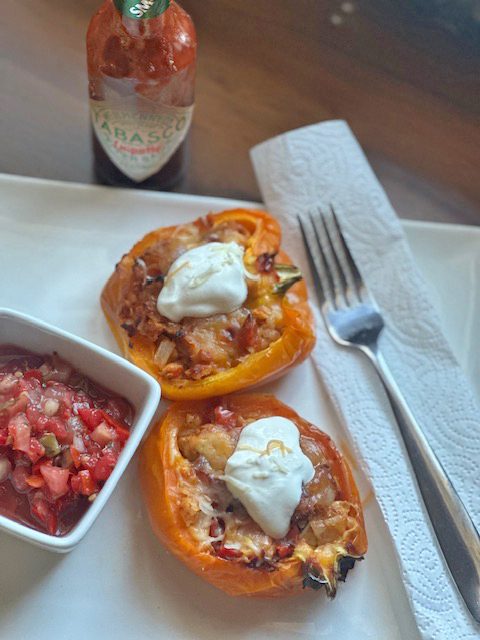
Fajita-Style Stuffed Peppers
This week’s blog was all about taking something older and putting a little work into it, giving it a refresher. Whether it is a boat, a bathroom, or a recipe, there is something to be said about using the good bones of something and revamping instead of going for the next bright and shiny thing. I wanted to honor this with a dish I loved growing up—the stuffed pepper. The tender green pepper, loaded with ground beef, rice, and sauce, had all the components I loved growing up. While my family will eat it, it’s not their favorite, so I had to brainstorm ways to make it more appealing to them.
While grappling with what to do, my son said something so simple that I am embarrassed it never crossed my mind. Fajita stuffed peppers for the win! After a quick Google search, I found that this is a popular recipe—and one I’m definitely excited about! So grab your cutting board, make a margarita, and celebrate Fajita Friday with me. Ole!
Ingredients:
-
6 bell peppers (I chose red and orange, but green will work just fine)
-
1 large onion
-
1 lime
-
1 rotisserie chicken, shredded
-
1 cup of white rice
-
1 packet of fajita seasoning
-
1 medium container of fresh salsa
-
1 package of Mexican cheese
-
Sour cream and guacamole to top
Directions:
-
Start by cooking your rice according to package directions. When done, set aside.
-
Cut the peppers lengthwise and remove the seeds and white membranes.
-
Place in a preheated 425-degree oven and cook until the peppers have some give to them.
-
In a large sauté pan, cook the onions until tender. Once they are cooked, add the shredded chicken, rice, fajita seasoning, and salsa. Combine all ingredients thoroughly. Test the mixture for seasoning, and at this point, adjust to your own taste by adding hot sauce and additional salt if needed.
-
Stuff the filling into the halved peppers and top with the cheese.
-
Cover with tinfoil and bake at 350°F for 30 minutes. Then remove the foil and bake an additional 15 minutes or so until the peppers are tender and the cheese is melted and slightly browned. Make sure to keep a close eye to avoid overcooking the cheese.
Notes:
-
These can be prepared and stored in the refrigerator a day or two in advance and just popped in the oven. For best results, let them sit out at room temperature for an hour before cooking.
-
Play around with other ingredients. A Philly cheesesteak version would be fantastic! I recommend slightly undercooking the meat for this one to prevent drying out the shaved steak. Top this with breadcrumbs, and you will undoubtedly have a great bite of food.
-
Plan for two servings per person if the peppers run on the small side.
-
Make extra for lunch the next day! They’re easy to store and reheat.
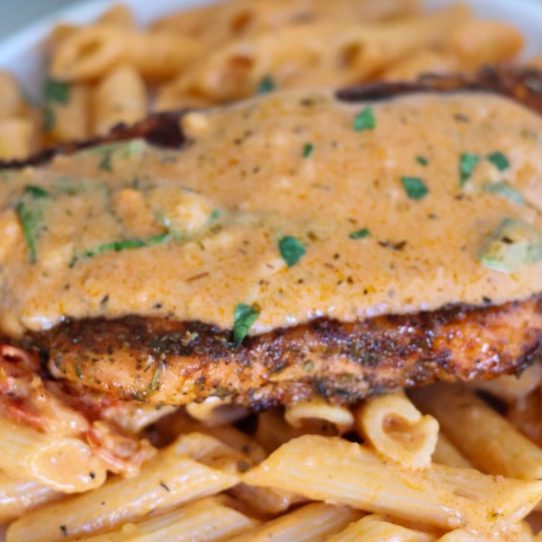
Marry Me Sauce
Do you want to fall in love with a sauce? Plan future nights together? Experiment with new ideas but always know the foundation is strong? Well, let me introduce you to something special—a sauce with a complex flavor that comes together so effortlessly you can dress it up with a special protein like lobster or simplify it with chicken. The options are endless, but let me tell you where my cupid’s arrow hit tonight: salmon.
A beautiful filet, roasted quickly in a 425-degree oven with just a touch of salt, pepper, and olive oil. Not much had to be done to it because the sauce is the star of this dish, and you’ll be singing a love song to it long after the meal is done.
Ingredients:
- 2 Tbsp unsalted butter
- 1 Tbsp flour
- 1 medium onion, finely chopped
- ½ tsp kosher salt
- ½ cup fresh basil, finely chopped
- ½ cup sun-dried tomatoes (in oil, drained), roughly chopped
- 3 cloves garlic, finely chopped
- ½ tsp dried oregano
- ¼ tsp crushed red pepper flakes
- 1 Tbsp tomato paste
- ½ cup dry white wine or broth (chicken, vegetable, or seafood, depending on the protein)
- 1 cup heavy cream (unflavored coconut milk can be substituted)
- ½ cup Parmesan, grated
- 2 cups baby spinach
- 1 medium lemon, juiced (adjust to taste)
Directions:
- In a heavy saucepan, sauté the onions in the butter until translucent. Season with salt, then add the sun-dried tomatoes, garlic, dried herbs, and fresh basil.
- Sprinkle with flour and cook for 1-2 minutes until combined and fragrant.
- Add the tomato paste and cook until fully dissolved, then deglaze the pan with the wine.
- Once the wine has reduced by half, add the heavy cream (or coconut milk). Reduce heat and let simmer.
- Add the Parmesan cheese in small increments to avoid clumping, then stir in the spinach.
- Squeeze in the lemon juice and adjust salt, acid, and heat (red pepper flakes) to taste.
- Toss with penne and add the protein of your choice.
Notes:
- The sauce can be made up to two days in advance and stored in an airtight container. Reheat gently to avoid burning.
- If cooking for a larger group, double the sauce recipe—people will eat this by the spoonful, so you’ll want enough!
Perfect Protein Pairings:
✔ Chicken Meatballs (I’m trying this one next!)
✔ Lobster
✔ Salmon
✔ Shrimp
✔ Scallops
✔ Chicken
✔ Pork Chops
Enjoy, and may love be in the air for you—not only on Valentine’s Day but every day of the year! 💕💕💕💕
Chicken Soup
You all know I cook a lot. There is not a stew, braise, roast, or pasta dish that could not make me a happy woman, but when I am feeling run down both physically and emotionally, nothing hits the spot like homemade chicken soup. From the first sip of the broth to the veggies and aromatics, it truly is a culinary panacea. Now, there are a lot of ways to approach a chicken soup. You can go traditional, Asian, Thai, or honestly, open a premade can and heat it up. It’s all good.
What I have for you here is my favorite go-to when feeling under the weather. It has your staple ingredients that make this a beloved soup, but then it’s kicked up a notch or two with some natural ingredients that improve your immune system and help you get through the sludge of cold and flu season. Let’s break it down…
Ingredients
- One whole cooked roaster chicken (skin removed) rotisserie chicken will work in a pinch; meat removed and pulled apart
- 3 carrots, diced
- 1 large onion, diced
- 2 celery sticks, diced
- 3 garlic cloves, minced
- Grated ginger
- 1 tablespoon turmeric
- 1 lemon
- 2 boxes of low-sodium chicken broth
- Salt and pepper to taste
Note: I do not put starch in my soup as I feel it absorbs all the wonderful broth as it sits. This also allows me to freeze leftovers without ruining the integrity of the soup. Prepare your egg noodles or rice on the side and incorporate as you go.
Directions
In a large Dutch oven, sauté your mirepoix until the vegetables begin to soften. Add garlic and ginger, and cook until fragrant. Add turmeric, squeezed lemon, chicken, and chicken broth. Simmer and taste for salt and pepper seasoning.
Enjoy and stay healthy, my friends!

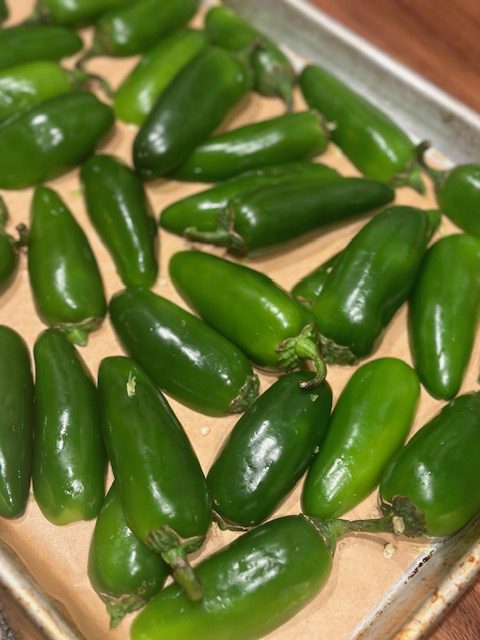
Bacon-Wrapped Jalapeño Peppers
Here’s a dish that will surely kick it up a notch at holiday gatherings. I take no credit for this one—I was purely on basic kitchen-help duty—but it’s definitely worth sharing. Here’s the story…
My youngest had a work potluck party today. All week, he debated what to bring, changing his mind as often as the New England weather. While I offered a wide array of options—from hot honey wings to pulled pork sliders—every one of my suggestions (or, maybe more accurately, my interferences) was promptly discarded. Frustrated, I threw in the towel, went out to dinner in protest, and returned to find a surprisingly well-thought-out array of ingredients in various stages of preparation.
While he didn’t let me participate in the cooking process, he did allow me to take pictures and notes (as long as he wasn’t in any photos) to share with you all. I apologize for the approximate measurements of the topping—he prefers the “dump and taste until you like it” method of cooking.
Here’s how it’s done:
Ingredients
- 15 jalapeños, halved and seeded (wear gloves and work in a well-ventilated area!)
- 3 packages of cream cheese, softened
- 2 packages of Boursin Garlic & Herb cheese
- 2 packages of bacon
- 1 heaping cup of brown sugar
- A good shake (or five) of:
- Salt
- Pepper
- Garlic powder
- Onion powder
- Smoked paprika
Directions
The Jalapeños:
- Preheat oven to 425°F.
- Halve the jalapeños and remove the seeds and membranes.
- Place them cut-side down on a greased or parchment-lined cookie sheet.
- Roast for 15–20 minutes until the skins are softened.
- Remove from the oven and let cool.
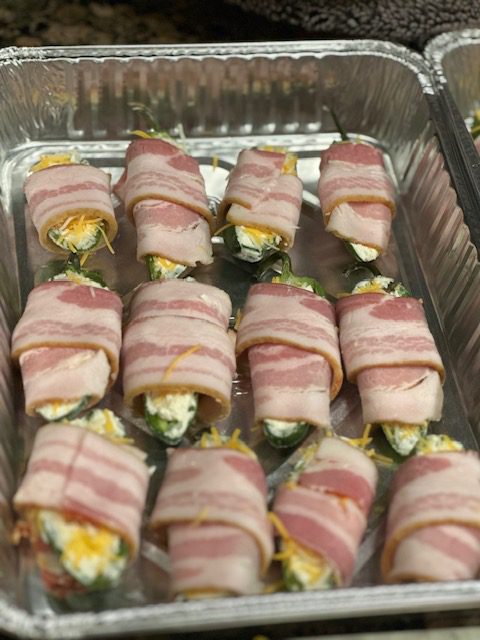
The Filling:
- In a large bowl or kitchen mixer, combine cream cheese and Boursin until smooth.
- Transfer the cheese mixture to an oven-safe pan and warm until softened.
- Spoon the mixture into a Ziplock or piping bag and snip off the tip.
- Fill the jalapeño halves with the cheese mixture.
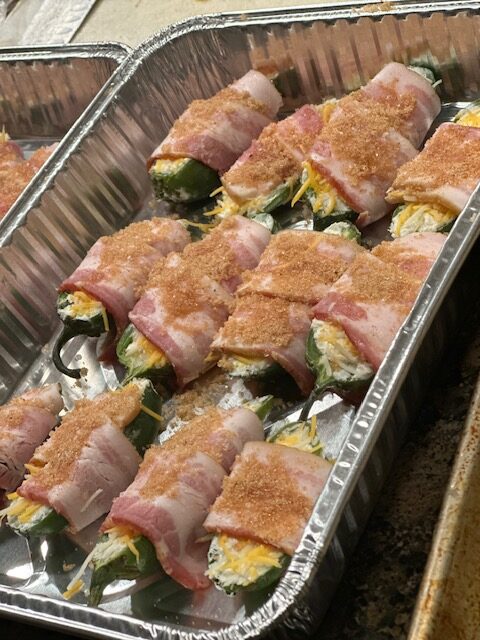
The Finish:
- Wrap each jalapeño with a slice of bacon.
- Top with the brown sugar mixture (combine brown sugar with seasonings to taste).
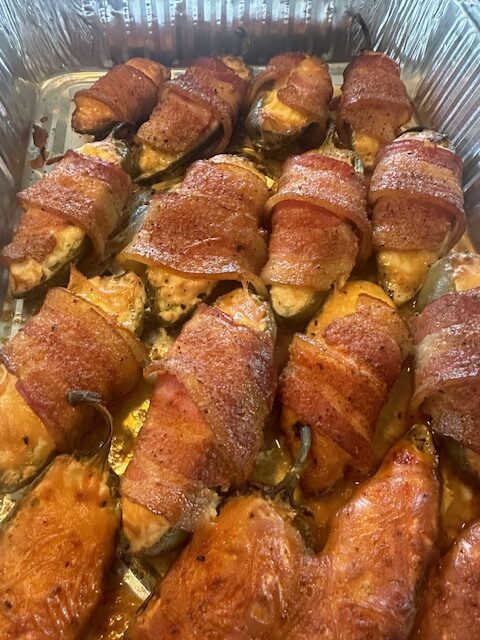
- For smokers: Leave detailed instructions for Mom to smoke the peppers at 225°F for 2 hours until the bacon is cooked through but not crispy.
- If you don’t have a smoker, bake in the oven at 350°F until the bacon is fully cooked.
- Clean up the kitchen!
Notes:
- Always wear gloves when handling jalapeños and work in a well-ventilated space.
- Serve warm for the best flavor.
Enjoy this crowd-pleasing dish—it’s sure to be a hit!

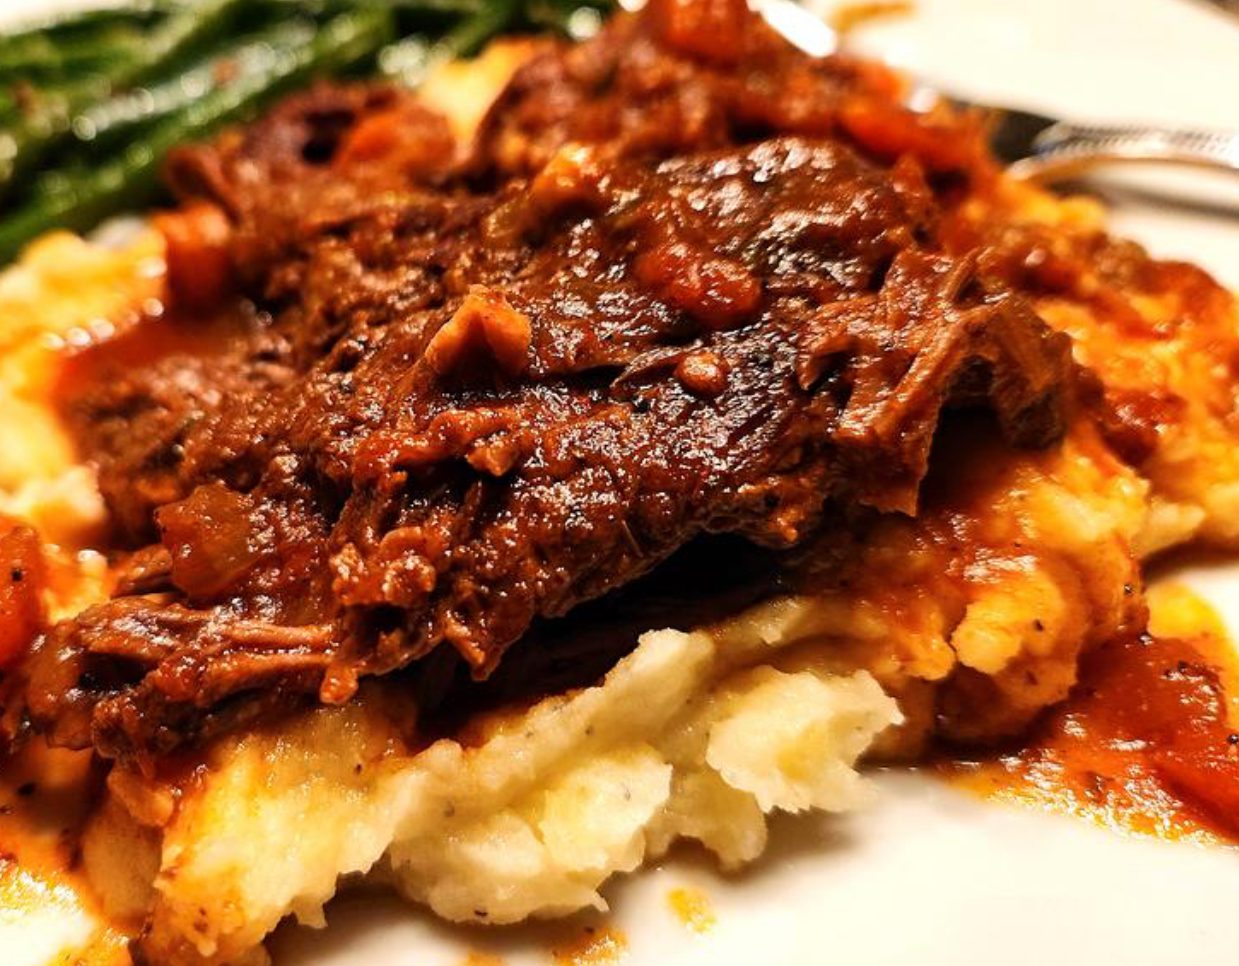
Stracotto (Italian Pot Roast)
Well, we are well into fall. The leaves are mostly down, the Thanksgiving shopping list is written, and Christmas is just about a month away. Do you know what that means to me? It’s time to break out the big Dutch oven, cook a roast, and let the oven warm up the house while infusing it with the scent of onions, garlic, and umami-flavored broths.
It’s just the medicine you need to get through those days when the sun goes down at 5:30 pm, and the oil bill climbs to $530 because some people in the house are too fragile to put on an extra layer or a pair of socks to keep warm (Yup, I’m talking about myself!). I get cold if someone leaves the refrigerator door open.
That’s why low and slow is my favorite way to cook. I get heat, comfort food to fill the belly, and aromas that Yankee Candle should consider for their next rollout. Okay, I have waxed poetic too long about this—it’s time to get my sear on and start the process!
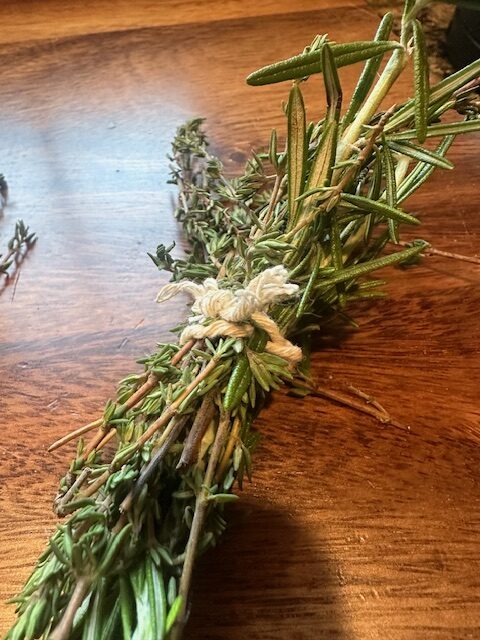
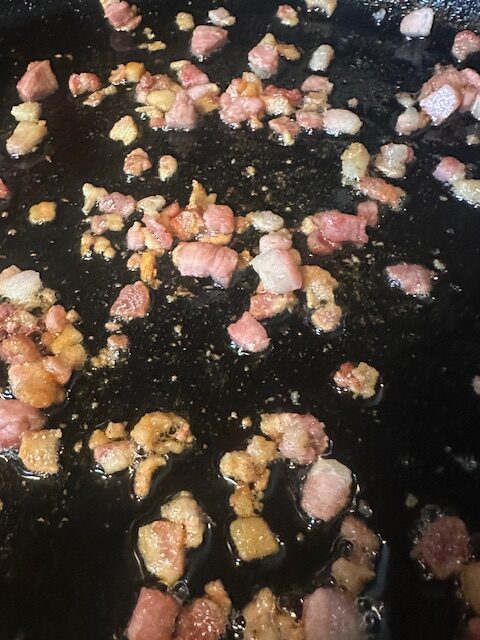
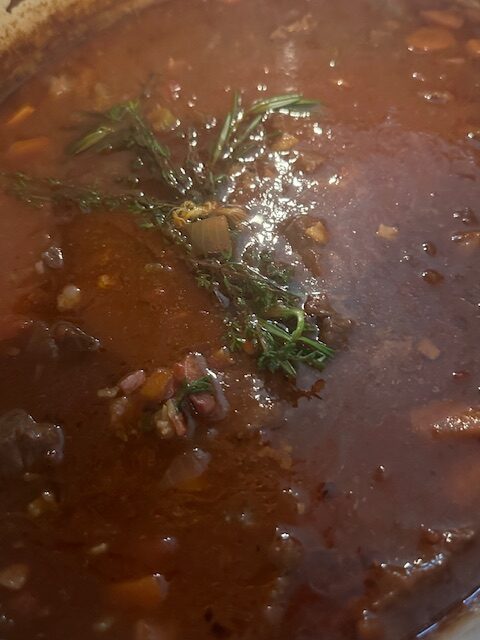
Ingredients
- 4 ounces of pancetta
- 3 pounds chuck beef, cut into pieces
- 1 cup each of diced celery, carrots, and onions
- 3 small heads of chopped garlic
- 2 cups beef broth (I use low sodium to control the salt)
- 1 (14.5-ounce) can San Marzano tomatoes, hand-crushed
- A bouquet of fresh thyme, rosemary, and 2 bay leaves (if you cannot get fresh herbs, substitute 1 teaspoon of dried for each)
- Salt and pepper to taste
Directions
- Heat olive oil in a large Dutch oven and brown the beef on all sides.
- Remove beef and add onions, carrots, and celery. Sauté until they begin to soften.
- Add garlic and sauté for 1–2 minutes, keeping a watchful eye to avoid burning.
- Deglaze the pan with red wine, gently scraping the bottom to release all the flavors.
- Add the broth, tomatoes, and the herb bouquet.
- Cover and simmer on low heat for 2–4 hours, until the beef is fork-tender and easily pulls apart.
Serve with polenta, mashed potatoes, or a simple green salad.
And don’t forget the crusty bread for dipping into that sauce!
Buen Appetito!
Notes:
- Roast can be cooked in the oven at 275°F for 2–4 hours after final assembly.
- A crockpot can also be used: cook on low for 8–10 hours or high for 4–6 hours.
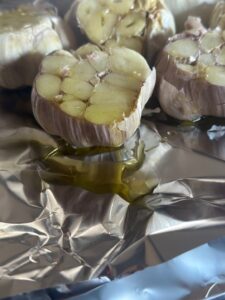
- Feel free to add your favorite ingredients to the dish—mushrooms are a great option, and my husband loves a bit of turnip. Make it your own!
- While the oven is on low, roast some garlic bulbs (see the recipe in The Galley). These can be frozen in ice cube trays for future use or spread on warm bread.
- Time saver: Make it the day or night before. The flavors develop even more when it has time to rest. It’s the perfect make-ahead dish!
BBQ for a Bunch
It’s that time of year—the leaves have fallen, the fireplace is lit, and what takes a big priority in my house…football Sundays. We love to have friends over and fill the house with noise and fun. But how do you enjoy it yourself without being chained to the kitchen? BBQ, baby! It’s food that can feed a crowd, is pretty hands-off to make, and pairs perfectly with paper plates and rolls of paper towels.
I recently put together this meal for the fantastic men and women at our winter boat yard as a thank-you for everything they do for us, hauling us in and out every year. They enjoyed it, I loved making it, and you know what… taking care of those who take care of us is the greatest reward. Now, are you ready to light up your smoker (or your crockpot, oven, or Instant Pot) for these saucy dishes? Kickoff is coming soon, so let’s goooooooooo!
Before we begin, let’s talk about the difference between a dry brine and a wet brine. I prefer a dry brine—a combination of spices that includes brown sugar and a variety of chili seasonings. Once mixed, store in an airtight container, and it will last for up to a year. If you’re not feeling ambitious, go ahead and buy a premade rub. I got one from Amazon that I really like; I’ll share the link below.
Dry brining is simply rubbing your preferred spice mixture all over the meat and letting it sit in the fridge uncovered for 24–48 hours. That being said, this technique is best for the smoker. If you’re using a crockpot or other method, brining doesn’t add much to the flavor.
A wet brine is a simple solution of one cup of salt to one gallon of water. Submerge the meat and let it sit in the refrigerator for 12–24 hours. Choose the method that best suits your cooking style.
The Cut of Meat: For pulled pork, you need a pork shoulder, also known as a Boston butt. This cut has a great balance of fat and lean muscle, contributing to tender, flavorful meat.
Ingredients
Pork Shoulder
- The Rub
- 1/2 cup smoked paprika
- 1/3 cup dark brown sugar
- 1/4 cup salt
- 1/4 cup garlic powde
- 2 tablespoons black pepper
- 2 tablespoons chili powder
- 2 tablespoons onion powder
- 2 tablespoons chipotle chili pepper
- 1 tablespoon cayenne pepper
- 1 tablespoon cumin
- 1 tablespoon dry mustard
Directions
- Prepare your meat with a wet or dry brine. Allow it to sit for 12–24 hours.
- Place in your chosen cooking apparatus.
- Cook for:
-
-
- Smoker: 1.5 hours per pound
- Crockpot: Low for 8–10 hours, High for 4–5 hours (add one cup of liquid, such as broth or water)
- Instant Pot: 45 minutes, then 10–15 minutes of natural release
-
Once the meat is cooked, let it cool until you can pull it apart by hand or with two forks. Toss with your favorite BBQ sauce and enjoy!
The Sides
- Mac and cheese
- Baked beans
- Cornbread
- Rolls for sandwiches
- Coleslaw
- Wet naps!
The Cheat
Don’t have the time, inclination, or proper cookware or smoker to do this on your own? No problem. You can fast-track this process by purchasing pre-cooked, shredded pork at your local big-box store. It typically comes unsauced, so you can add your favorite BBQ flavors—go traditional, Hawaiian, or one of my all-time favorites, Mexican (Carnitas). This shortcut lets you enjoy the meal in the time it takes to heat it up in the microwave. No shame in the shortcut game! If it tastes good to you, that’s all that matters. You can also check out your local BBQ joints, many of which offer party packages that make your life even easier, even if you just get the sides from them.
- Costco: costco.com
- Chester’s: chestersbbq.com (for my local friends in Groton, CT)
- Gold Belly: goldbelly.com – Ships nationwide
Roasted Brussels Sprouts and Butternut Squash
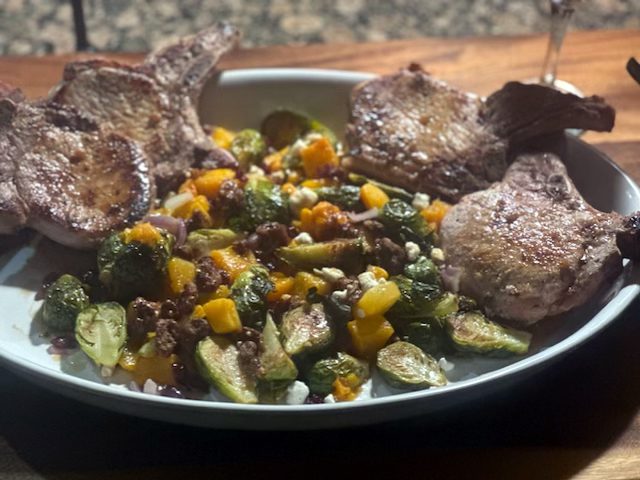
As we move into the end of October, I am feeling all the nostalgia of Fall. The leaves are coming down in beautiful colors, the early sunsets, football Sundays, and, best of all…comfort food! Bring on the braise, the roast, the soups. I want it all. The only problem is the weather has been remarkably warm, which means more boat time and less oven time. To counteract this, I settled on a light, easy dish that incorporates all the flavors I crave while still staying light. So here we go…
Ingredients
- Pork chops
- 1 pound Brussels sprouts, trimmed and halved
- 3 cups butternut squash, cubed
- 1 medium shallot, sliced
- 1 tablespoon olive oil
- Salt and pepper, to taste
- 1 cup walnut halves
- 2 tablespoons maple syrup
- 1/2 cup dried cranberries
- 1 ounce goat cheese, crumbled (optional)
Directions
- Preheat the Oven Preheat your oven to 400°F
- Prepare the Vegetables In a large mixing bowl, toss together 1 pound halved Brussels sprouts, 3 cups cubed butternut squash, and 1 sliced shallot with 1 tablespoon olive oil until everything is well coated. The olive oil helps the vegetables roast evenly, creating a beautiful caramelization.
- Season and Roast Spread the vegetables in a single layer on a baking sheet, ensuring they are evenly spaced. This will allow them to roast rather than steam. Sprinkle with salt and pepper. Roast for about 30 minutes, tossing halfway through to ensure even cooking. The vegetables are ready when they are tender and lightly caramelized.
- Make the Maple Walnuts While the vegetables are roasting, heat a small skillet over medium-high heat. Add 1 cup walnut halves and 2 tablespoons maple syrup to the pan. Stir constantly for 2-4 minutes until the syrup thickens and coats the walnuts, turning them into sweet, sticky clusters. Once done, transfer the maple-coated walnuts to a plate to cool. They will harden slightly as they cool, creating a perfect crunchy texture.
- Combine and Serve
Once the vegetables are finished roasting, remove them from the oven and immediately stir in 1/2 cup dried cranberries. The heat from the vegetables will slightly plump up the cranberries, enhancing their natural sweetness. Top the roasted vegetables with the maple walnuts, and if desired, add crumbled goat cheese for an extra layer of creamy tanginess. Serve the dish warm and enjoy the combination of fall flavors!
Tips:
*This time of year you can find the squash already peeled and cubed. Use these, just check the size of the cuts. You want the Brussels and the squash the same size to roast evenly and for consistency in the presentation.
*Don’t want to glaze your own walnuts? Look for pre-glazed ones in your local supermarket.
*Feel free to substitute your favorite cut of pork. A chop or a tenderloin would both work beautifully with this. Not a fan of pork? Chicken would work beautifully as would a hearty piece of salmon.
*If you have leftovers, reheat the veggies in the oven to regain the dish’s crispness and texture.
Loaded Mashed Twice Baked Potato Casserole
Remember my blog post about my cruising club? They are dear friends we travel with during the summer, exploring all the great places I’ve shared with you. This past year, we decided that our time on the boats wasn’t enough, so we started having monthly dinners. We rotate hosting at each other’s homes, and, as you can imagine, we always end up talking about—well, boats! Shocking, right?
The host is responsible for the main dish, while the other couples bring the sides or dessert. This past week was extra special because one of the couples is heading off on their own adventure to a warmer climate. For their bon voyage dinner, I was tasked with making a side dish. I couldn’t decide between mashed potatoes or twice-baked potatoes. After a quick Google search, I found the perfect compromise: a Loaded Twice Baked Potato Casserole!
If you love potatoes as much as I do, you need to do two things:
- Make this now.
- Throw your diet out the window.
I promise, it’s worth it. Let’s dig in…
Ingredients
- 1 (5 lb) bag of russet potatoes
- 6 strips of bacon
- 1 pint of heavy cream
- ½ cup sour cream
- 1 stick of butter
- 2 cups cheddar cheese (plus extra for topping)
- 2 cups panko
- Salt and pepper to taste
Directions
- Start by chopping the potatoes and boiling them until tender.
- Mash them well. I prefer using a potato masher so there are still a few chunks.
- Mix in the butter, sour cream, and heavy cream until creamy.
- Season with salt and pepper, then stir in the cheddar cheese and bacon.
- Place the mixture in a large baking dish, top with more cheese and bacon, and bake until hot, bubbly, and absolutely delicious!

Dessert
Dessert. Ugh. It is truly my nemesis. I can make a beautiful dessert charcuterie, assembling delicious bites of sweetness that others have made. I can actually make a mean crème brûlée, but put flour into the mix (pun intended here!), and it all goes off the rails. I believe there are two reasons for this. One is that I don’t like measuring and the precision that baking requires. Two, as I stated in another post, I am not a sweet eater. Give me a chip over a cookie any day (unless it’s Tate’s chocolate chip!). That being said, I live in a house of sweet tooths and wanted to step up my game and incorporate my homemade libations: Kahlúa and limoncello. The cake was surprisingly easy to make. And the affogato? Forget about it. Simple, elegant, and my favorite… just assembling. So, let’s get to it.
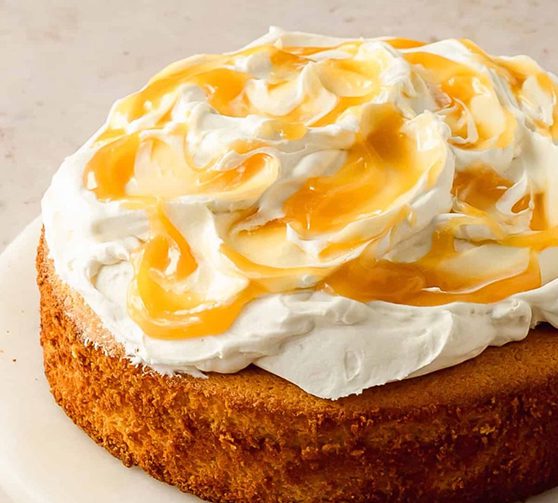
Limoncello Cake (recipe from olivesntyme.com)
Ingredients
- 2 cups (240 g) all-purpose flour
- 2 teaspoons baking powder
- ½ teaspoon salt
- 1¼ cups granulated sugar
- 2 large lemons, zested
- 3 large eggs, room temperature
- ¾ cup olive oil
- ½ cup limoncello
- ¼ cup lemon juice
- ¼ cup sour cream, room temperature
Mascarpone Frosting
- 8 oz. mascarpone cheese
- 1 cup powdered sugar
- 2 teaspoons vanilla extract
- 1 cup cold heavy whipping cream
- ¼ – ½ cup lemon curd
Directions
- Preheat the oven to 350°F (177°C). Grease and line the bottom of a 9-inch (23 cm) springform or cake pan with parchment paper.
- In a large bowl, whisk together the flour, baking powder, and salt until well combined.
- In another large mixing bowl fitted with the whisk attachment, whisk the sugar and lemon zest together until they resemble wet sand.
- On low speed, whisk the eggs into the lemon-sugar mixture until combined. Increase the speed to high and whip for 2-3 minutes. The mixture should become thick and light yellow in color.
- On low speed, gradually stream in the olive oil, followed by the limoncello, lemon juice, and sour cream. Once combined, continue mixing for another minute. Scrape the sides and bottom of the bowl as needed.
- On low speed, whisk in the dry ingredients until just incorporated.
- Evenly pour the batter into the prepared pan. Bake for 35-45 minutes or until a toothpick inserted into the center comes out clean or with a few moist crumbs. The crust should be golden brown, and the top should bounce back when pressed.
- Cool the cake in the pan for 15 minutes. Gently release the sides of the springform pan, remove the ring, and allow the cake to cool completely before frosting.
For the frosting:
- Place a mixing bowl and whisk attachment in the fridge or freezer for 15-20 minutes before making the frosting.
- On low speed, whisk the mascarpone cheese until smooth. Add the vanilla extract and powdered sugar, mixing until well combined.
- Gradually add the heavy cream while whisking on low. Once incorporated, increase the speed to medium and whisk for 2-3 minutes, until the frosting is light and fluffy.
- Once the cake is completely cool, top it with the mascarpone frosting. Use the back of a spoon to create decorative swirls. Drop dollops of lemon curd into the swirls, and gently swirl it into the frosting.
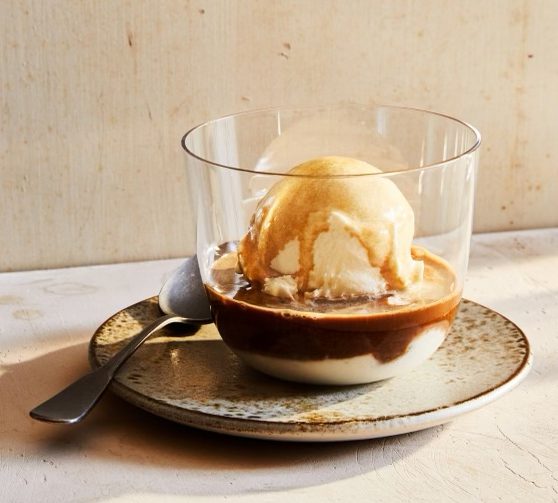
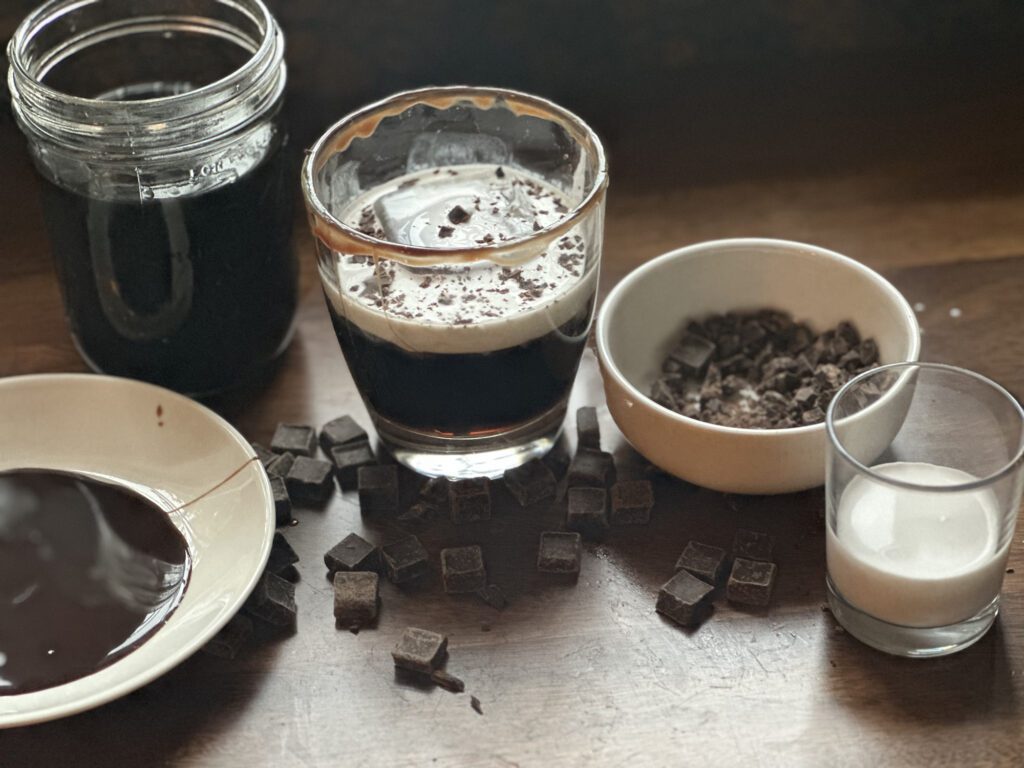
Affogato
Why is this dessert a home run for me? It takes only a few minutes to make—no measuring, no mess, it’s elegant, and best of all… delicious! If you want a dessert that impresses without the stress, this one is for you.
Ingredients
- Good vanilla bean ice cream or gelato
- Espresso
- Kahlúa
Directions
- Place a scoop of ice cream in your favorite serving vessel (I prefer clear glass so you can see the beautiful layers of the dish).
- Pour the espresso over the ice cream.
- Top off with Kahlúa.
That’s it. Finito. Molto delizioso!
Pizza
Well, I’m not reinventing the wheel here, but I’m definitely putting some toppings on it. (See what I did there?) Let’s talk pizza. Pie. Slices. Whatever you call it, it doesn’t matter—it’s delicious! Since we’re talking about rafting up this week, I thought I’d share one of my favorite shareable meals with friends. I love this because everyone brings something different to the table—literally. You learn a lot about a person by their choice of toppings. Lol. Who’s the classic, the adventurer, and the one with no taste who always picks Hawaiian (yes, your sweet husband—I stand by the fact that pineapple does not belong on pizza!)? Let’s roll up our sleeves and dig in.
The bread vehicle
I’m a thin-crust girl. All I want is a sturdy, crispy shell to load my toppings on. Being celiac, the whole dough experience is lost on me, but I can get a delicious frozen cauliflower crust, and it’s perfect. Even the family loves it, though I tend not to share. They have their own options like store-bought dough, or for an even easier option when you don’t want to pull out the flour on the boat for rolling, grab the flatbreads. These packets make fantastic individual pizzas, are shelf-stable, and all you need is a quick grill before creating your masterpiece. Buon Appetito!
Cooking the crust
Don’t have a high-temperature pizza oven on board that could melt your fiberglass in seconds? Well, that’s probably a good thing! Let’s look at other options to keep the boat in one piece. I believe in pre-cooking the crust. When you’re limited, I use our flat top (check out the Blackstone mini griddle—we use it for almost everything). You can also use a cast-iron pan or grill over an open flame. Pre-cooking gives a great foundation for layers of ingredients without getting soggy.
Building your pie
Now the fun begins. Want a white pizza? Try a little alfredo as your base. Classic? Rao’s has an excellent pizza sauce if you don’t want to make your own. Want something sweet? Go for BBQ sauce. The possibilities are endless. Top with your favorite cheese, and you’re good to go!
Your base options
- Pizza dough
- Flatbread
- Frozen pizza shells
Favorite standbys
- Margherita
- Pepperoni
- Chicken and broccoli
Specialty pizzas
- Clam and bacon
- Chicken bacon ranch
- Buffalo chicken
- Philly cheesesteak
- Pulled pork
- Hawaiian (ugh… had to list this one because it’s the husband’s favorite, but you will NEVER see that slice coming near this girl’s mouth!)
Off the grid
- Breakfast pizza: Eggs, bacon, ham, cheese… throw it all on. Double the carbs and toss a few home fries or tater tots on there. You won’t be mad about it!
- Dessert pizza: Roll out cookie dough crust. If allergies permit, after baking, smear a thin layer of peanut butter to adhere the candy. Now top with whatever sweet treats float your boat. Go crazy and finish with a melted chocolate drizzle.


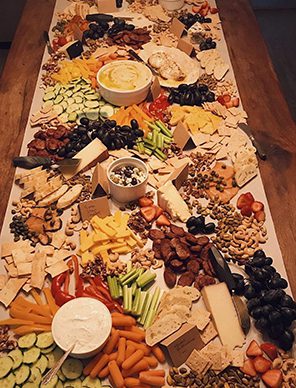
Charcuterie
It comes as no surprise to those who know me that I adore a charcuterie board. From the tastiest cheeses, meats, olives, and savory spreads to a dessert board filled with chocolate-covered strawberries, cookies, and even mini crème brûlées and mousses, your creations are only limited by your imagination, as they really can be a work of art. The best part of all is that there is very little prep involved. It really is about the assembly.
The Vessel
So, you ran to the market, stocked up on all the delicious offerings available, and came home with enough food to host a small wedding. It’s easy to do, believe me. Now what? Where will it all fit? The plating of the board starts with the board. You have so many options here. My go-to is my largest cutting board. Don’t worry if yours has seen better days. All it takes is some fresh greens, such as arugula or kale, to cover the bottom and add color. You can also use a cookie sheet or, my favorite for large gatherings, a craft paper table runner. Just lay it all out, and you will have a fantastic grazing table. It really is up to your individual preference and imagination.
The Offerings
Now, this is the fun part! There are so many ways to go with this. Here is a list of a few of my favorites:
-
Antipasto
- Cheeses
- Olives
- Breadsticks
- Meats (Prosciutto, salami)
- Tapenades
- Crostinis
-
Breakfast
- Mini bagels
- Mini muffins
- Fruit
- Mini quiches
- Deviled eggs
- Jellies and fruit spreads
-
Dessert
- Chocolate-covered strawberries
- Tate’s cookies
- Brownie bites
- Assorted chocolates
- Small jelly jars of M&M’s
-
Movie Night or Kid’s Party
- Popcorn
- Swedish Fish
- Twizzlers
- Pudding cups
Be forewarned, though… after picking at all your favorite bites, you may not have room for anything else!


Jambalaya
Here is a go-to boat meal that can be made in advance and frozen (without the rice) for an easy cruising meal. When ready to eat, just defrost, reheat gently, and add a packet of microwave rice, and you are good to go. It’s a dish that just gets better the longer it sits.
Ingredients
- 3 green peppers, chopped
- 1 large onion, chopped
- 1 stalk of celery, chopped
- 1 jalapeño, diced
- 2 cloves of garlic, minced
- 1 large can of tomatoes, roughly chopped (I prefer San Marzano)
- 1 container of chicken broth
- Creole seasoning to taste
- 1 package of skinless, boneless chicken thighs
- 1 package of kielbasa (andouille sausage is traditional, but I like the lightness of kielbasa; chef’s choice!)
- 1 lb of medium shrimp, peeled, deveined, and tails removed
- 1/2 cup of long-grain rice
Directions
- In a large sauté pan, cook the chicken and remove it to a holding plate when done.
- Add more oil to the pan and sauté the peppers, onions, garlic, and celery until soft.
- Add the chicken back into the pan along with the kielbasa, tomatoes, and chicken broth.
- Season generously with your Creole seasoning, and add the shrimp. Let simmer until the shrimp is cooked through.
- If you are eating immediately, add your rice now. If freezing, hold off on this step and add it once it is reheated.
- Cook on low/medium heat until the rice is done. If needed, add more broth during the process.
- Serve and enjoy with some cornbread as a delicious accompaniment.
This should make the instructions clearer and ensure that the steps are easy to follow. Enjoy your jambalaya!

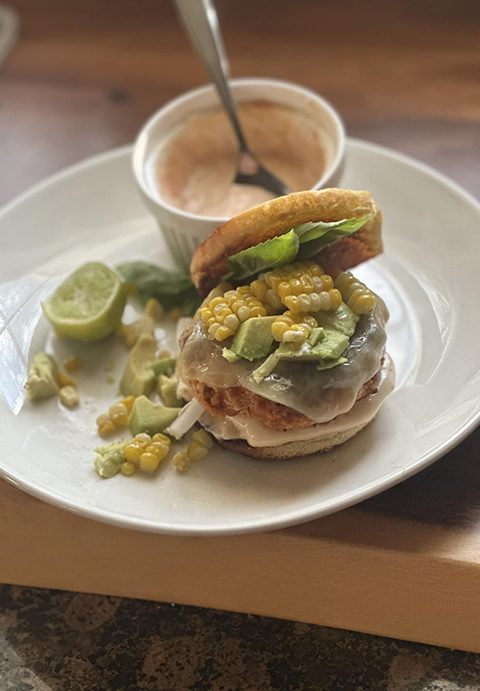
Southwest Chicken Burger
Get ready to have one of your favorite burgers of all time. We are not going the classic route here—not an all-beef patty on a sesame bun version, but a chicken burger layered with delicious flavor, starting from the initial patty liberally seasoned to all the tasty toppings. The best part is that, as you know, I am a champion of doing the prep in advance, so all you have to do when you are hungry is throw these beauties on the grill and assemble them when ready. Now, let’s get started because I want to dig into mine before my crew of men in the house gets a hold of them. It’s survival of the fittest when it comes to this meal because they go that fast! Seriously. They are that good. Make extra because you will be craving another one the next day.
The Ingredients
The Burgers (serves 4)
- 1 lb of ground chicken
- 1/2 cup panko breadcrumbs
- 1-2 tablespoons of chipotle in adobo
- 1/2 teaspoon smoked paprika
- 1/2 teaspoon chili powder
- 1/2 teaspoon garlic powder
- Salt and pepper to taste
- 4 slices of sharp cheddar cheese
- Hamburger buns of your choosing
The Sauce
- 1 cup of mayonnaise
- 2 teaspoons of chipotle with adobo
- Lime juice to taste
The Toppings
- 2 ears of fresh corn, grilled and kernels removed from the cob
- 1 avocado, lightly smashed
- Chopped red onion
- Cilantro to taste
Directions
Combine burger ingredients with a gentle hand so as not to over-pack the meat. Form the patties and let them set up in the fridge while you assemble the sauce and the toppings. When ready, rub your patties with oil and heat your cast iron pan or grill to medium-high heat. Cook burgers for 8-10 minutes per side until the internal temperature reaches 165°F.
Once at a safe temperature, pull them off and let them rest while you assemble the bun. I like to gently toast or grill mine until a slight crust forms on the inside. Now begin building. Spread the chipotle sauce on the lower buns. Be generous here. The burger and toppings need this beautiful sauce. Add your burger and finish by layering your onion, avocado, and corn. Finish by sprinkling a little salt and pepper and some chopped cilantro. If you are among the many who don’t care for this herb, feel free to substitute basil or go without. I find that fresh herbs help cut through the sauce and pair beautifully with the fresh corn. Top off with your other half of the bun and dig in. The only thing you will miss is more room in your stomach because you will want two of these.
Enjoy!
Libations
The weather is getting warmer, and visions of weekend boat relaxation dance happily in my mind. While I love talking about all the great food to be had, we cannot forget about making some delicious liquor concoctions. I make these now because they both have to sit for a bit before consumption, but with a little effort, you will be all set for the summer (and fall) to create a number of yummy cocktails on the cheap.
Limoncello and Kahlúa. I grew up with both of these homebrews being made. My father made Kahlúa. I don’t remember if it was for house consumption or gift giving but every year I now make a vat of it. It is seriously easy to make. I like to bottle it in mason jars, giving me an easy grab as a hospitality gift or to take on the boat for a mudslide or two. The rule with my recipients is that if you return the jar, you get a refill. Many jars have been left on my front porch. One year I did not make it and believe me…I heard about it!
Limoncello was not something that was created in my home but my mother every year would go to her best friend’s house to zest a mountain of lemons to make this nectar. This memory came up while visiting this friend last year and I wanted to give it a go. To say it was a big hit is an understatement. It now must stay in my spring calendar.
Now the Mocktail…. The mocktail is on the rise in many upscale establishments and frequently featured with great flourish. Owners are recognizing rest individually for a variety of reasons such as diet and sobriety, individuals are forgoing alcohol but still want a beautiful and delicious drink served in a nice piece of stemware instead of the Diet Coke and Shirley temple variations of the past. While exploring various options I chose to play around with this version for two reasons. It is delicious and the base can be made in bulk and frozen in cubes for easy preparation.
So let’s start a little bootlegging. The process is easy…the wait is excruciating!
What you will need:
The recipes
Kahlúa
- 6 cups of water
- 6 cups of sugar
- 1 cup cold brew ( 3/4 instant coffee and 2 cups of water will work too)
- 2 Vanilla beans ( or 3 tablespoons of vanilla extract. I prefer the beans for flavor as it sits. I get mine on Amazon)
- 1 liter of Vodka
Instructions:
- This is an easy two-step process. I am almost embarrassed to share it but here we go….
- Bring water to a simmer.
- When water is at a constant simmer slowly add the sugar and coffee, stirring frequently until you reach a syrup-like consistency.
- Remove from heat, and once cooled, add the vodka.
- Transfer into a large container and let sit for a week or so until all the flavors come together.
That’s it. You have Kahlúa. You can bottle it in mason jars or pour it back into the vodka bottle for storage.
Limoncello
Ingredients:
- 5 lbs unwaxed lemons ( I get mine from Amazon for $20)
- 4 cups of sugar
- 4 cups of water
- 1 handle of over 100 proof of Vodka
Instructions:
- With a potato peeler, remove skin from the lemons, being careful not to go down to the white.
- Place in a glass receptacle and pour in the vodka.
- Let sit for 1-3 weeks, swirling it every few days to keep things moving. It’s done when the lemon taste is predominant.
- With a fine strainer and a cheese cloth, strain the mixture, and then add the simple syrup to taste.
- Bottle and enjoy!
limoncello lasts longer in the freezer if you are not using it during the season.
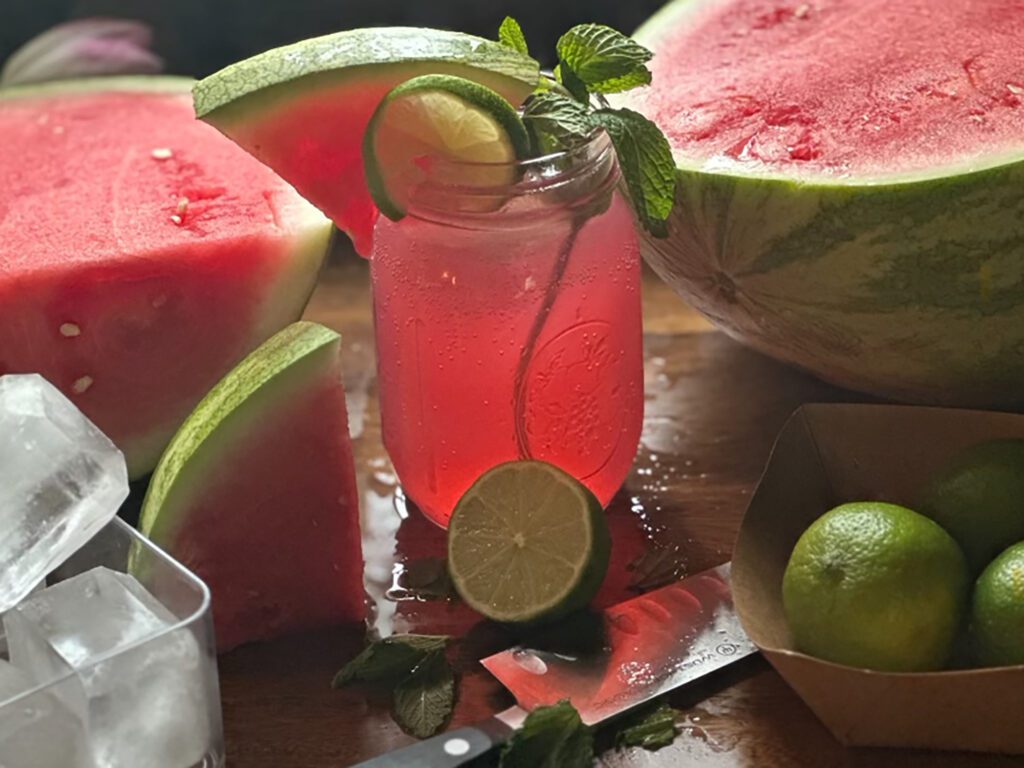
Watermelon Mockjito
Ingredients:
(Play with quantities to taste. I like mine with a 4-1 ratio of club soda to ginger ale.)
- Seedless watermelon (cubed)
- Mint
- Club soda
- Ginger ale
Instructions:
- In a blender purée watermelon
- Muddle mint
- Club Soda
- Ginger Ale
- Garnish with mint and watermelon slices
Have a big watermelon? Freeze the purée in an ice cube tray for easy preparation of your next batch. It is great to have it on hand. I have added a cube to lemonade, and it is delicious.

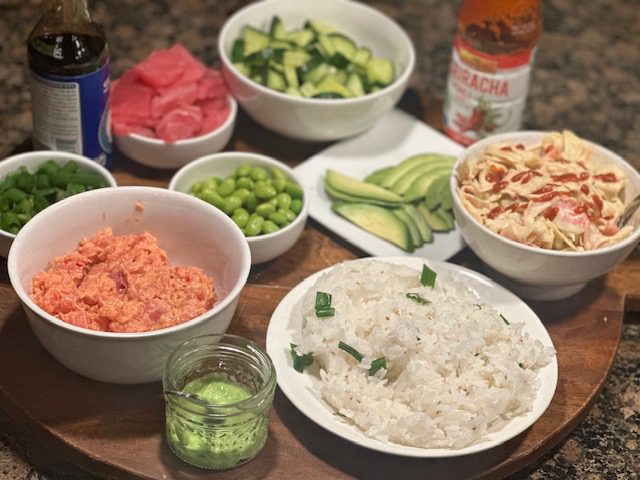
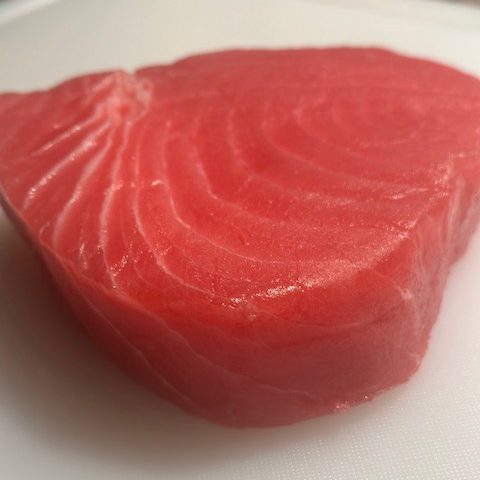
Ahi Poke Bowls
Ready for a boat meal that checks all the boxes? Well, here it is… the Ahi Tuna Poke Bowl. This is a favorite because it is easy, cost-efficient, delicious, and exactly what you want to eat on a hot summer night. All of the ingredients, except the rice and avocado, can be prepared in advance. Fresh tuna should be eaten within the day of purchase. Now, let’s put it all together! This is how I build mine.
Ingredients:
-
Sushi grade Ahi tuna diced into one-inch cubes (a pound of tuna should serve 4 people)
-
1/4 cup Soy sauce
-
2 Scallions diced
-
Sesame oil (1 tbsp)
-
Edamame (one bag steamed and shelled)
-
English cucumber halved and sliced thin
-
Thinly sliced radishes
-
Avocado (one quarter per person)
-
Cooked white rice (one cup per person)
-
Sriracha Mayo (one cup of mayo to 3 tbs of sriracha with a squeeze of lemon. Adjust to personal taste. Sesame seeds and chopped green onions for garnish
-
In a small bowl, combine the mayonnaise sriracha and a squeeze of lemon. Thin with a bit of water to drizzle if it is too dense.
-
In a medium bowl, combine tuna with scallions, soy sauce, and sesame oil. Gently toss to combine and set aside while you prepare the bowls.
-
In bowls, layer 1/2 the rice, 1/2 the tuna, avocado, cucumber, edamame and radishes.
-
Drizzle with spicy mayo, green onions, and sesame seeds.
Seafood Chowder
Yesterday we celebrated my sister’s birthday with the whole family. I asked her, beforehand, what she wanted me to make her and she quickly replied. My seafood chowder. Done! This is a perfect dish where you can prep everything ahead of time and just drop whatever fish and shellfish in right before serving and you are good to go. This is a fantastic boat meal because the base freezes beautifully and you then can purvey a local seafood market wherever you are and in a very short time you have a luxurious boat meal. Get creative and mix and match what is available and seasonal. Here is what I did today…
Ingredients (reprinted from Barefoot Contessa Cookbook)
-
3 tablespoons good olive oil
-
1 1/2 cups chopped yellow onions (2 small)
-
2 cups large-diced small white potatoes
-
2 cups chopped fennel (1 large bulb)
-
2 teaspoons kosher salt
-
1 teaspoon freshly ground black pepper
-
2 cups good white wine
-
1 (28-ounce) can plum tomatoes, chopped
-
1 quart Seafood Stock, recipe follows, or store-bought fish stock
-
1 tablespoon chopped garlic (3 cloves)
-
1 teaspoon saffron threads
-
1 pound large shrimp, shelled and deveined (reserve the shells for the stock)
-
1 pound each halibut and bass fillets, cut in large chunks
-
24 mussels, cleaned
-
3 tablespoons Pernod
-
1 teaspoon grated orange zest
-
Toasted baguette slices, buttered and rubbed with garlic
Seafood Stock:
-
2 tablespoons good olive oil
-
Shells from 1 pound large shrimp
-
2 cups chopped yellow onions (2 onions)
-
2 carrots, unpeeled and chopped
-
3 stalks celery, chopped
-
2 cloves of garlic, minced
-
1 1/2 quarts water
-
1/2 cup good white wine
-
1/3 cup tomato paste
-
1 tablespoon kosher salt
-
1 1/2 teaspoons freshly ground black
-
10 sprigs fresh thyme, including stems
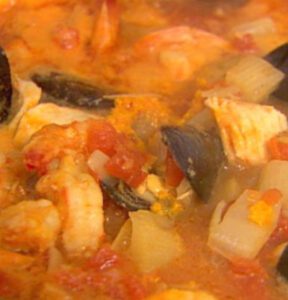
Cobb Salad
We have been having some outstanding March days, making me want to put aside the heavy sauces and braised meat for a lighter meal that is easy to put on the table while everyone takes advantage of the weather and works on boats. All components of this dish can be made in advance and assembled more quickly than you can mix up your favorite libation to accompany it. I did not put down quantities of the ingredients as it can made for two people or a large group. Adjust as needed.
Ingredients
- Hard-boiled eggs
-
Bacon
-
Grilled chicken breast ( or go ahead and chest and grab a rotisserie. I won’t tell!)
-
Red onion
-
Cucumbers
-
Avocados
-
Cherry Tomatoes
-
Romaine lettuce
-
Crumbled Blue Cheese
-
Balsamic Dijon Dressing (see below)
Dressing
-
Three tablespoons of Balsamic Vinegar
-
One tablespoon of Dijon Mustard
-
One head of finely minced or grated garlic
-
1/3 cup olive oil
-
Salt and pepper to taste
Put all ingredients in a mason jar with a lid and shake like crazy!
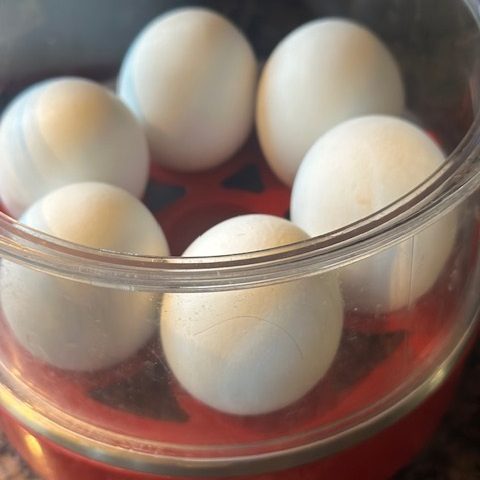
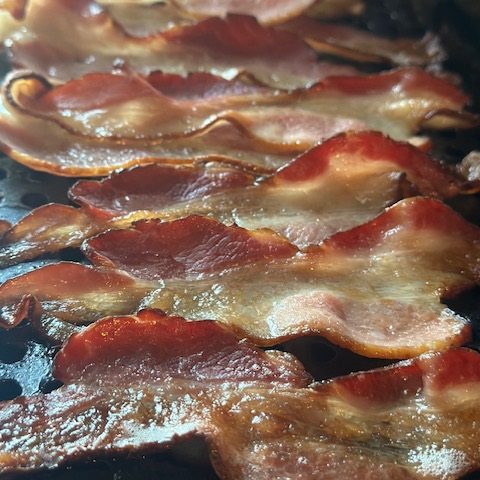
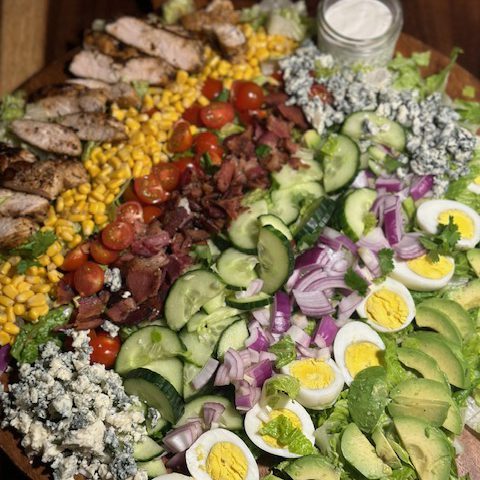
Paella
Paella is a classic Spanish rice dish, and outside of being unbelievably delicious, I love it because it is a one-pan dish that is perfect for entertaining. You can play with your proteins. I use chicken thighs, shrimp, scallops, mussels, and a smoky kielbasa, but many other options can be used. I have had it with calamari, lobster, and chorizo. Play with it and find your favorite combination that would goes with the traditional base of rice, peppers, tomatoes, and saffron. This can be made in a conventional skillet but I purchased a paella pan from Amazon that was very reasonably priced, and I love using it.
- 2 Peppers diced ( I mix my colors)
- 1 Onion diced
- 3 Tomatoes chopped
- 1 head garlic diced
- 3-4 boneless and skinless chicken thighs diced up
- 1/4 pound each of seafood (cooks choice but stay away from flaky fish)
- 2 cups of Bomba rice (Arborio rice can be substituted) * I purchase my Bomba from Amazon 1/4 cup of White wine
- 1 Bay leaf Smoked paprika
- Saffron
- Olive oil
- 5 cups Chicken broth
- Salt and pepper
- Parsley
- Lemon
Sauté the peppers and onion until they begin to get soften and then add the tomatoes and aromatics. Cook for a few minutes, add the white wine, and simmer for 10 minutes. Now, you are ready to add your chicken and rice. Combine all the base ingredients. After the base has been melded together, gently add the chicken broth. Give the pan a shake so the ingredients form a single layer, bring to a boil, and then reduce heat to a simmer. Now, the important part…. Do not stir it! You want the bottom to develop a crust. Cook uncovered for 15-20 minutes, shaking the pan once or twice, and then nestle in your seafood. Cover with a lid or tinfoil and cook until the shellfish opens. If you get close to the end and don’t feel like your rice is ready, add more broth. Finish with parsley and lemon. Enjoy!

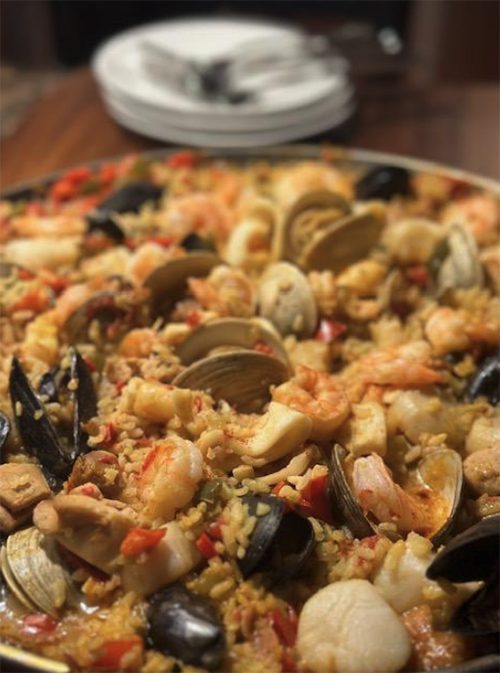
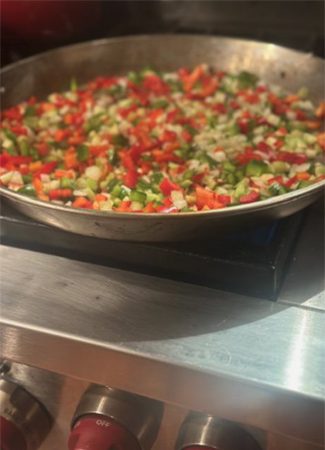
Caramelized Onions and Roasted Garlic
Not an onion fan? Well this post is not for you because I am going to wax poetically about the caramelized onion. These deep golden-brown gems, with the consistency of a loose jam are truly a thing of beauty. Are they a labor of love? Absolutely. But great things take time and a certain technique to achieve perfection. They have to be babied for about an hour or so but well worth it.
Here’s what you will need….
- 6-8 Vidalia onions
- Whole garlic heads
- Fresh thyme
- Butter
- Olive Oil
- Salt
- A heavy bottom pot ( or two!)
- Sharp knife
- Tin Foil
- Tissues. There will be tears!
Ok, here we go…
The first thing you need to get started is a really sharp knife. Rough cut onions release an enzyme that reacts to the water in your eyes. The sharper the knife, the fewer enzymes released. Another eye relief strategy is to freeze your onions for 30 minutes before cutting. While both of these strategies help, you still may tear up but it’s worth it. I like to use this time to tell my boys how much I love them with tears running down my face. It never gets old (for me).
So let’s grab those onions and get started. Peel and cut onions in half. Once prepped using that sharp knife mentioned above – slice your onions as thinly as possible while concentrating on the consistency of the slice so when you are cooking, they all caramelize at the same time. While doing this add the butter to your pan and let it melt. I do a stick per pan and have never been mad about it. On a medium to low heat start your onions by tossing them in with the butter to coat and add a generous amount of salt. The salt will release the water from the onions to start the process. Now you are good to go. Simple right? Caramelizing is easy.
Some important steps…
Do not leave your onions unattended. Toss them every 15 minutes.
Adjust your heat. These have to be cooked low and slow so take in the variables. Are you cooking with gas or electric, what kind of power does your stove top put out, what is the thickness of your pan. All of these things will dictate how often you need to babysit them.
When the onions have softened do not walk out of the kitchen. The last step of this process happens fast as the onions’ sugars form. You can go from being almost beautiful to destroyed in a matter of minutes. I speak from experience.
When done, spread out on a sheet pan to cool.
Now what?
What are you going to use this jammy goodness for? The possibilities are endless. You can go with traditional French onion soup, which is always a favorite, or you can play with them.
My favorite recipes using the onions.
Baked French onion meatball
halfbakedharvest.com/baked-french-onion-meatballs
Caramelized Onion Dip
howsweeteats.com/2021/04/caramelized-onion-dip
French onion chicken
themodernproper.com/french-onion-chicken